
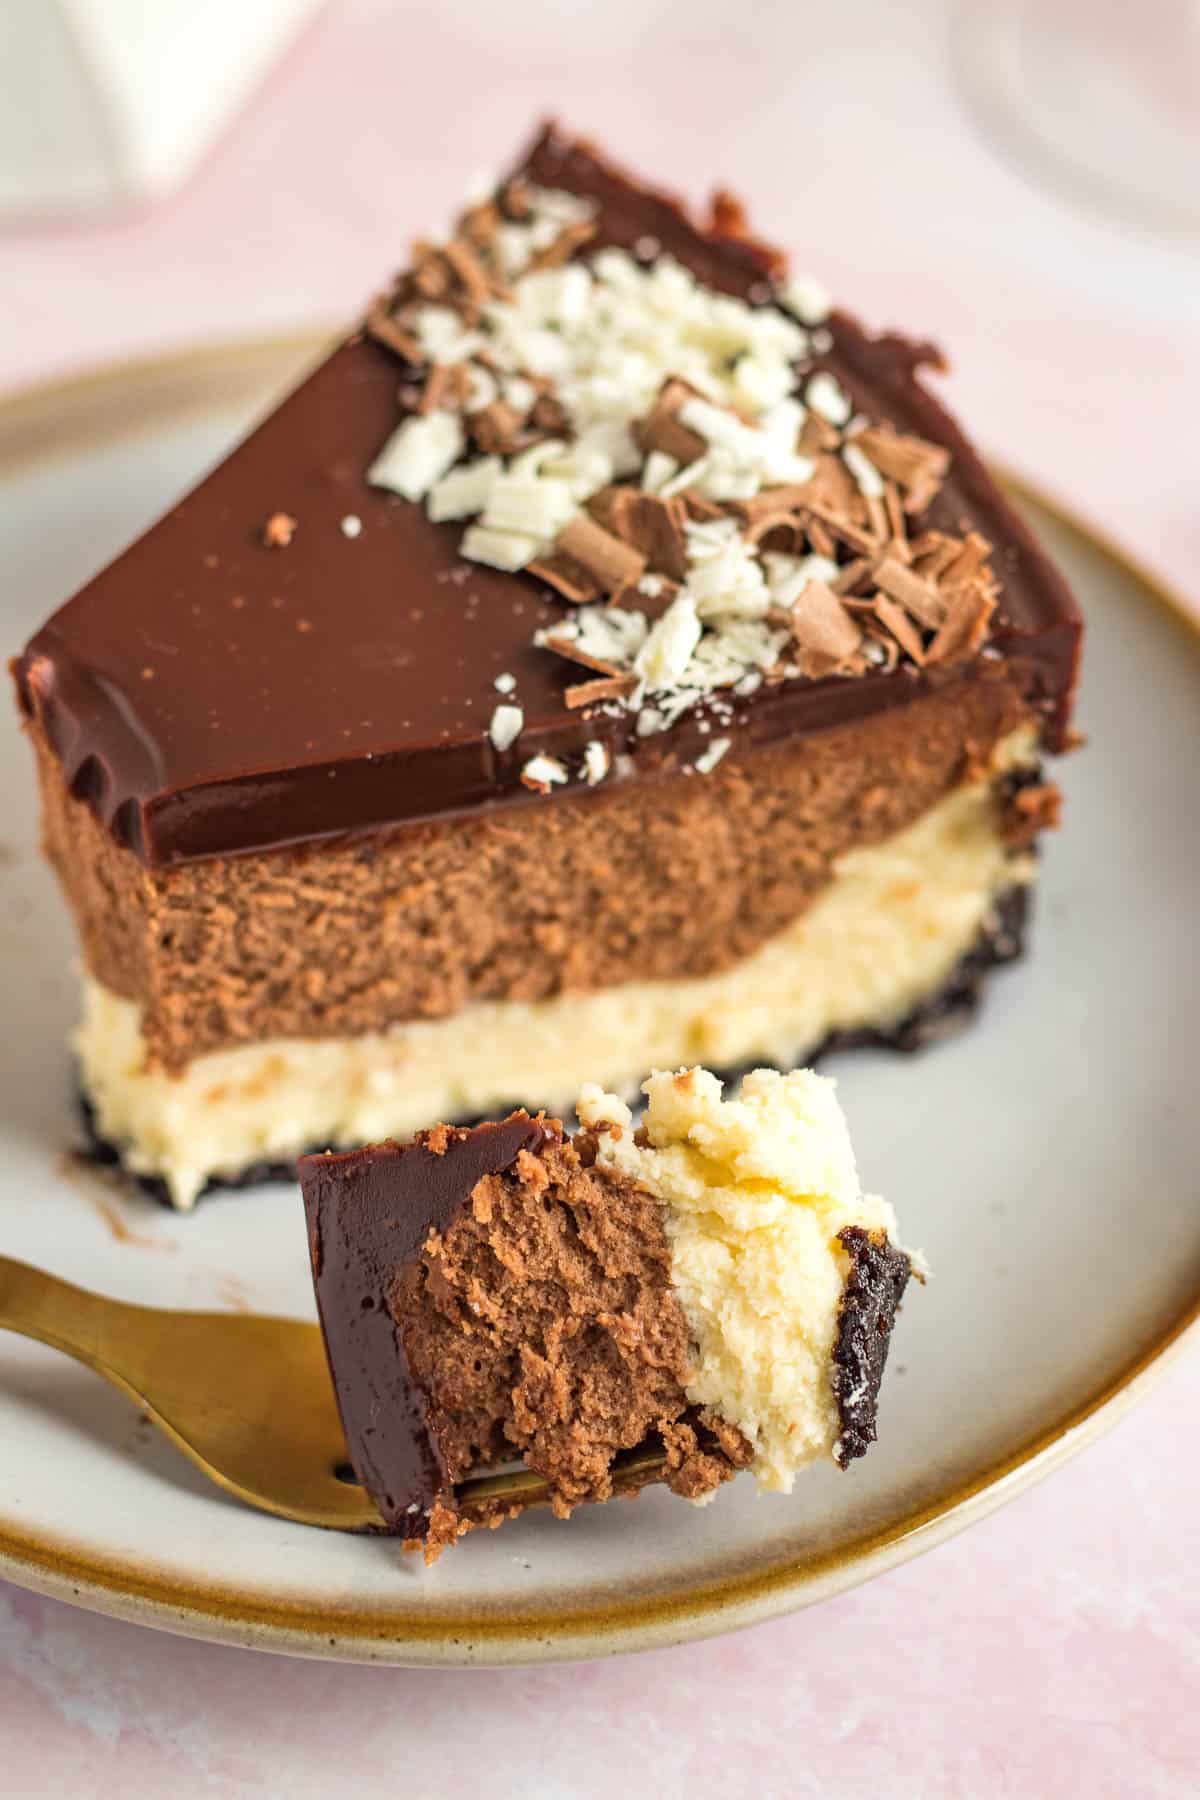
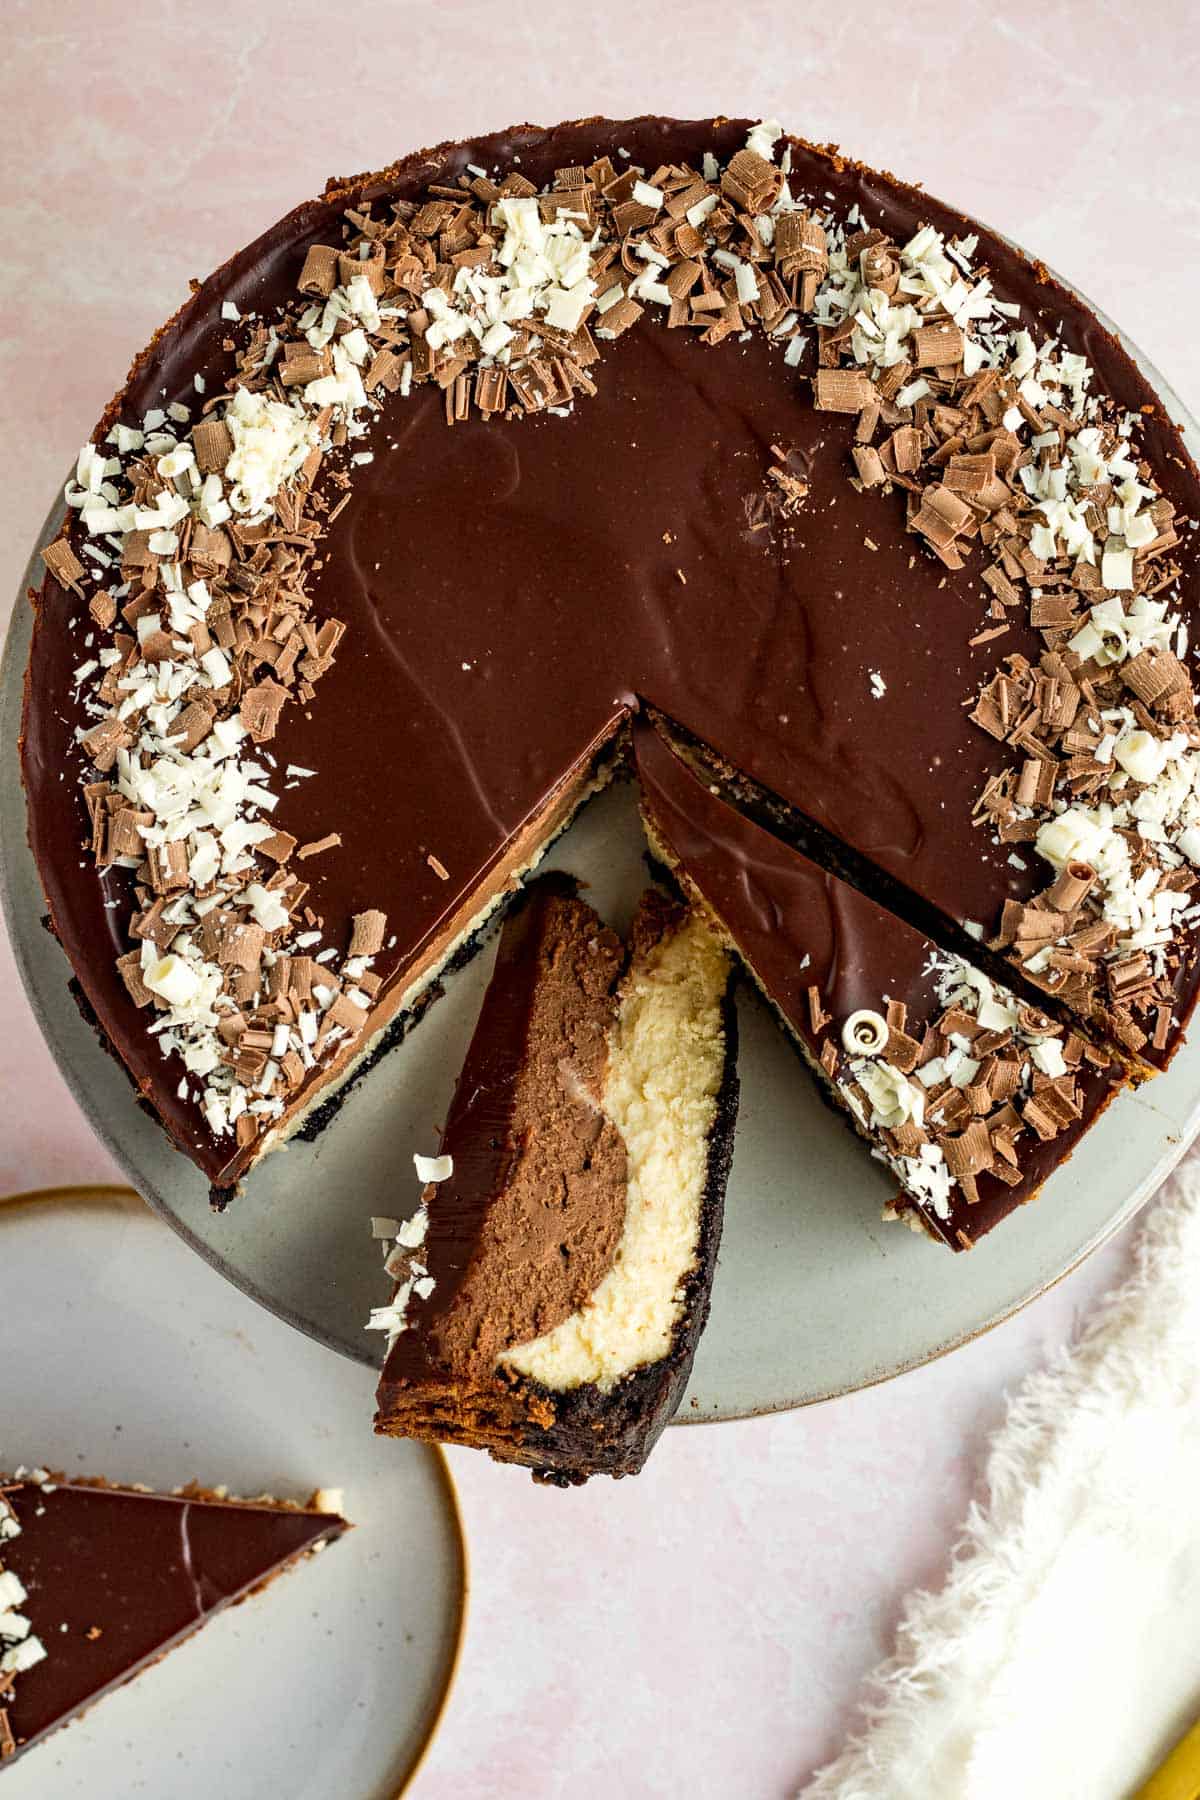
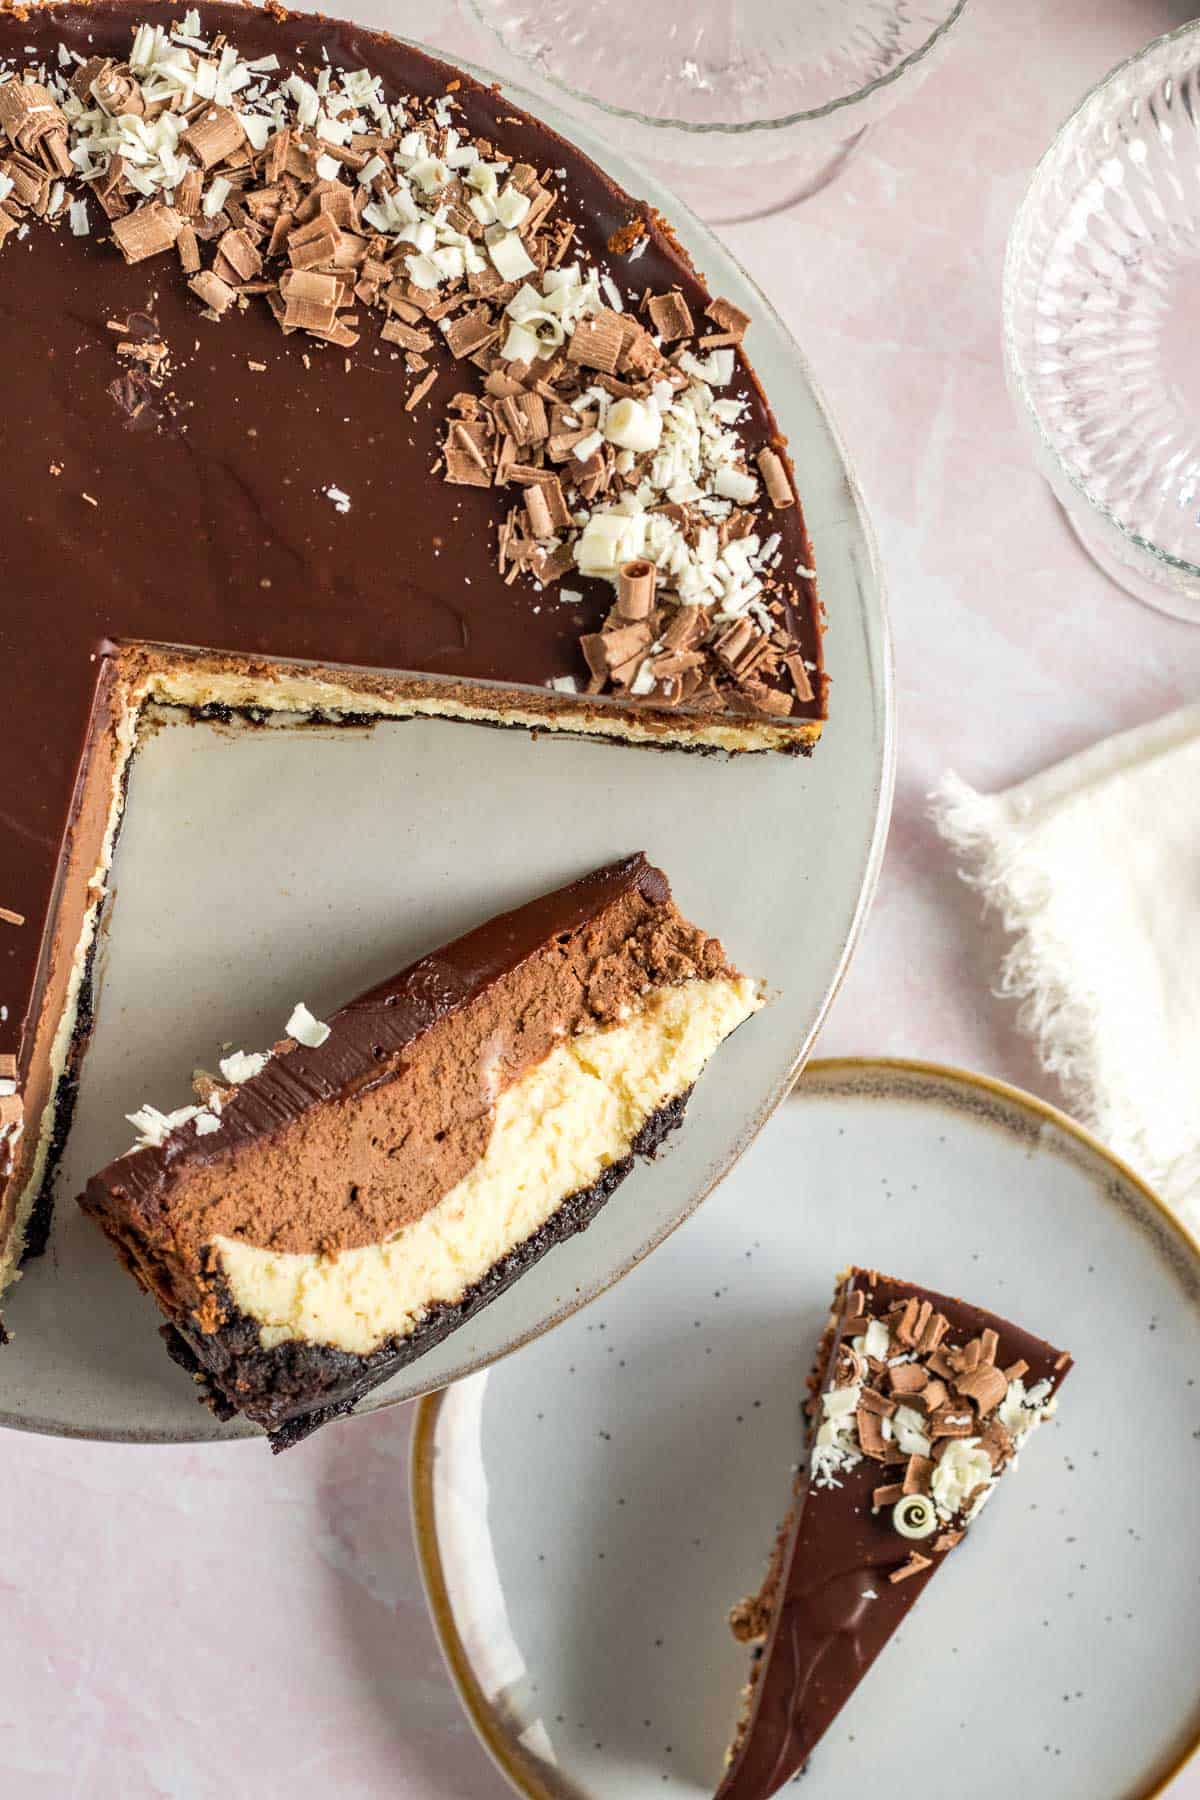
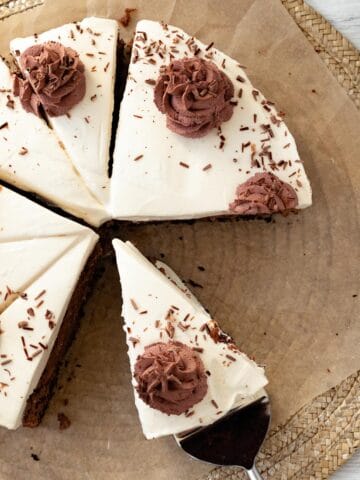
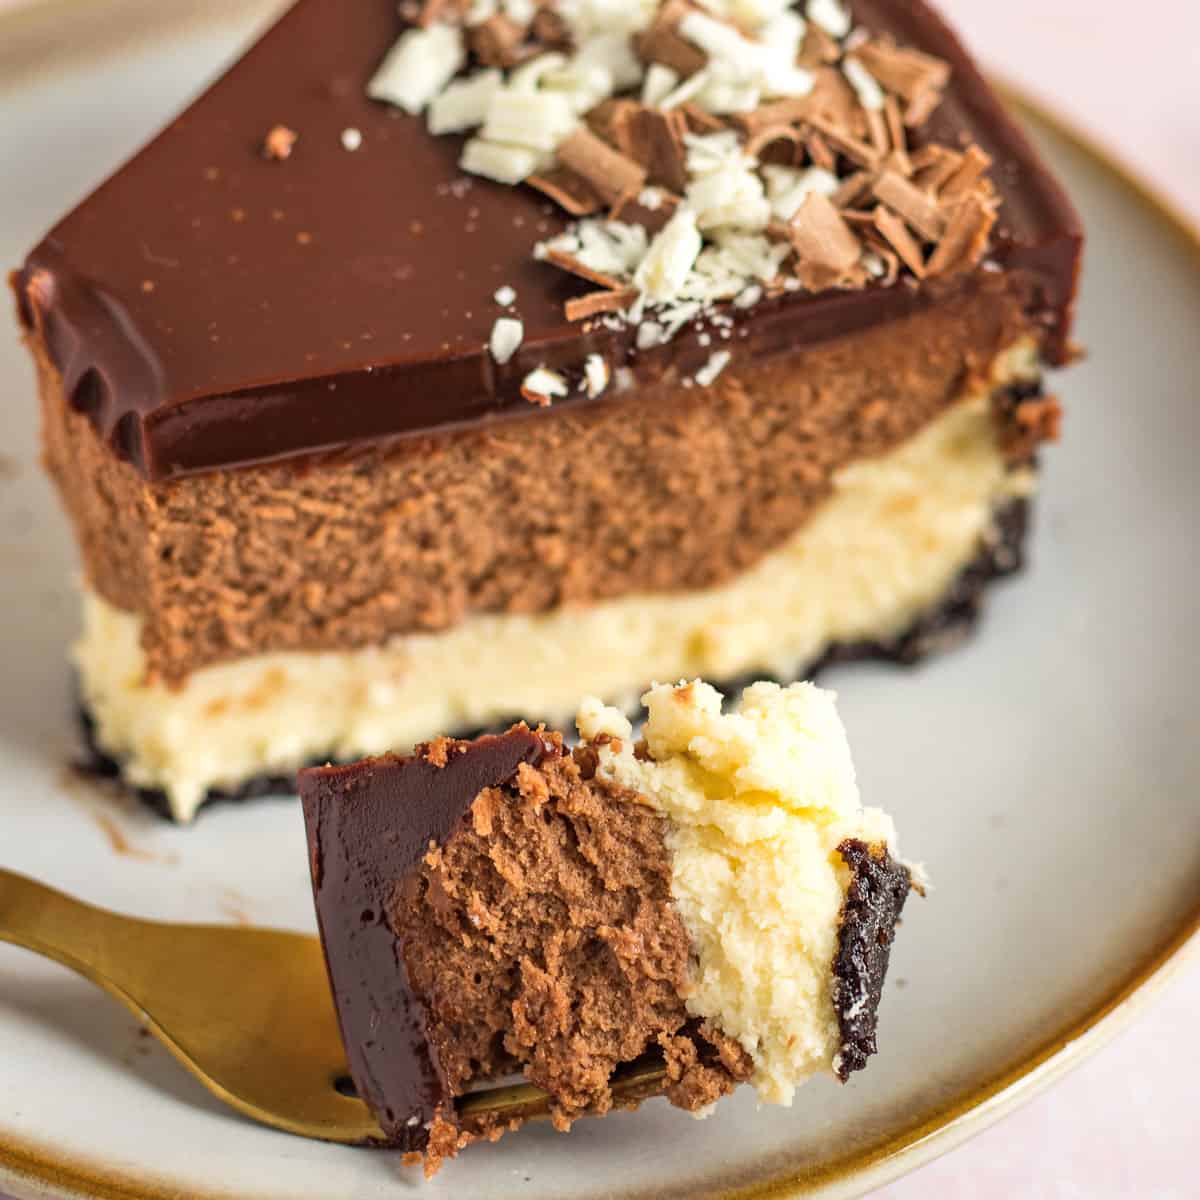
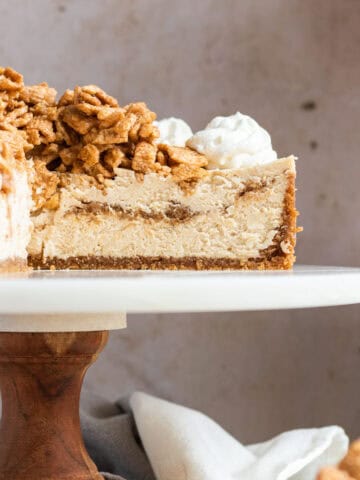
Delicious layers of bittersweet chocolate cheesecake and white chocolate cheesecake make up this elegant tuxedo cheesecake reminiscent of a classic tuxedo. A crunchy Oreo cookie crust forms the base of the cheesecake and a creamy and decadent chocolate ganache covers the entire top. Garnished with white chocolate and milk chocolate shavings, this cheesecake is divine!
A classic tuxedo with a white shirt and black coat is the visual inspiration for this tuxedo cheesecake. Cheesecakes aren't typically an everyday dessert so I wanted to develop an elegant and indulgent cheesecake worthy of a special occasion, and this one sure delivers!
Ingredient Highlights
- Oreos- This classic cookie is a great choice for a cheesecake crust. No need to scoop out the cream in the middle either as the whole cookie is used and combined with a little butter to bind it all together.
- Cream Cheese- I like to use Philadelphia cream cheese. For the best results, use full-fat cream cheese. Always use room-temperature cream cheese so you don't have little lumps in your cheesecake.
- Granulated Sugar- Just regular white sugar is needed for the cheesecake.
- Eggs- I use large eggs when I bake. Eggs are the binder in the recipe and help produce that creamy, custard-like texture.
- Vanilla extract- Try to use pure vanilla extract if you can instead of imitation vanilla.
- Kosher salt- Pretty much every baked good benefits from salt to offset the sweetness. I always use kosher salt, specifically the Diamond Kosher brand. I buy mine from Amazon and the box lasts a long time. If you use table salt, decrease the amount by half.
- Heavy Cream- Heavy cream makes super luscious and smooth cheesecakes. If you prefer more tanginess you could swap it for sour cream.
- Bittersweet Chocolate- You can use bittersweet chocolate bars or chips for the chocolate layer of the cheesecake. I used bittersweet chocolate but you could use semi-sweet chocolate as well.
- White Chocolate- Try to choose actual white chocolate and not almond bark for the white chocolate layer. You can use white chocolate chips or a bar.
Special Equipment
Cheesecakes do require a couple of special pieces of equipment to bake them successfully. Here are the things you'll want to have for the best cheesecake.
- 9-inch springform pan- You need the deeper sides of the springform pan as well as the removable ring to make the cheesecake.
- Heavy-duty foil- Heavy-duty foil is the best insurance to protect against a leaking water bath. I use 2 layers to be extra careful.
- Stand-mixer with the paddle attachment- This one is not absolutely necessary but the paddle attachment usually only found on stand mixers is the best way to prevent whipping too much air into the cheesecake. This is my favorite stand mixer.
- Roasting pan- A large roasting pan is needed for the water bath. It needs to be large enough for the 9-inch springform pan to fit into.
Tips for a perfect cheesecake
- Room Temperature Ingredients: This is so important! Make sure your cream cheese is at room temperature before mixing it. If it is still cold, you will likely have little lumps of cream cheese throughout your cheesecake filling and will incorporate too much air trying to beat it. You also want your eggs to be at room temperature before adding them as well.
- Water Bath!! This is one of the most important parts of making a cheesecake and can seem fussy but it's how to keep cheesecake from cracking. It's also super easy to do as well. To see how to set up a water bath to cook your cheesecake in, check out my bourbon eggnog cheesecake post. A water bath will provide a moist environment for the oven and allow the cheesecake to cook more evenly. Cooking without a water bath will almost ensure you end up with a cracked cheesecake. I've tried the trick of placing a pan of hot water on the rack underneath the cheesecake and it just doesn't do the trick like a true water bath does.
- Slow Cooling: To cool your cheesecake properly, when it is done cooking, turn the oven off and crack the door open. Let it cool for 1 hour in the water bath in the turned-off oven. Then, remove it and let it cool for another 30 minutes to an hour on the counter before placing it into the fridge to finish chilling for at least 6 hours or preferably overnight. This will prevent it from cooling too quickly and cracking.
- Paddle Attachment: If you have a stand mixer with a stand attachment, opt for using it. Using the paddle attachment at a lower speed prevents too much air from being whipped into the cheesecake. If you don't have a stand mixer, just beat it at a lower speed with a hand mixer.
How to layer the cheesecake
In a no-bake cheesecake, you can have a sharp line between the two easily because you can chill the first layer before adding the second. In a baked cheesecake, this is more difficult to do as you don't want to bake one layer and then add the next as the cheesecake will be baked unevenly.
Layer the first batter into the crust and smooth the top. Once the first layer is down, gently spoon dollops of the second cheesecake batter onto the top of the other layer.
Keep distributing the dollops evenly over the top. You will mostly cover the top this way so just use an off-set spatula or the back of a spoon to gently fill in any holes. Don't press down while doing this. While the line won't be perfectly straight between the layers, you will still have two definite layers in this tuxedo cheesecake.
How to garnish the cheesecake
Instead of using whipped cream as I usually do on top of my cheesecakes, I used chocolate shavings. I wanted a more elegant look and I thought the contrast of the two different chocolates would help me achieve that.
I had a milk chocolate bar on hand when I made this tuxedo cheesecake so I used that for the chocolate shavings and a white chocolate bar for the white shavings. To shave chocolate, use a vegetable peeler down the longer side of the chocolate bar to form curls of chocolate.
Some of mine were curls and some were shavings from broken curls. I think they both look great. If you want more curls than shards, the chocolate needs to be slightly warmer so the curls don't break. To warm an unwrapped bar, hold it between your hands for a couple of minutes to warm it up. If you have unwrapped it, place it between parchment or wax paper and do the same.
How to know when a cheesecake is done
Knowing when to take a cheesecake out of the oven can be intimidating. You just spent all of that time and money on this glorious cheesecake only to cut into a soupy mess or saw through an overbaked cheesecake. No one wants that!
All ovens are different so one of the most important things is to check it early to make sure you don't have an overbaked cheesecake. Begin checking the cheesecake for doneness around 65-70 minutes.
When you give the cheesecake pan a slight jiggle, you should see that the edges (about 1-2 inches) of the cheesecake are set and don't move. The middle part of the cheesecake should slightly jiggle but should not move like it is still liquid.
If you still can't tell by the jiggle test, you can also test it with an instant-read thermometer. Check in the middle of the cheesecake for a temperature of 150 degrees to 155 degrees F. Because chocolate ganache is covering the tuxedo cheesecake, you don't need to worry about the hole the thermometer will create.
FAQ's
If you don't have a large roasting pan for the springform pan, a little cheat to a water bath is to place a pan of water on the rack below the cheesecake. This creates steam in the oven in a similar way to a traditional water bath. This won't be the same as cooking it in a water bath and you may still get a small crack but it is better than cooking it without one.
How to freeze a cheesecake
You can make the entire cheesecake and then freeze it if you need to plan ahead. Cool the cheesecake completely in the refrigerator for at least 6 hours or overnight. Once completely cooled, remove it from the springform pan. Place it on a round cardboard cake circle or a heavy-duty plastic plate.
Freeze the cheesecake for about an hour uncovered. It needs to be cold enough to wrap tightly without squishing it. After an hour or so, remove the cheesecake and wrap it tightly in plastic wrap and then foil. It should last at least 1 to 2 months if wrapped properly.
To thaw it out, place the cheesecake into the refrigerator the night before you will need to serve it. You can also slice the cheesecake before freezing it and freeze individual slices of cheesecake, wrapped in the same way as a whole one.
How long is cheesecake good for
This tuxedo cheesecake will be good for about 5 days if stored covered in the refrigerator. I like to put the springform ring back around it and then cover the whole pan with foil when storing leftovers.
For more cheesecake recipes, check these out:
Tag me on Instagram @themarblekitchenblog if you make this and leave a star rating and comment below! Thank you and enjoy!
Tuxedo Cheesecake
Ingredients
Oreo Crust
- 24 Oreos about 2-2 ½ cups crushed
- 5 tablespoons unsalted butter
Cheesecake Filling
- 32 ounces (4-8oz packages) cream cheese full fat, room temperature
- 1 cup (200 grams) granulated sugar
- 4 large eggs room temperature
- 2 teaspoons vanilla extract
- ½ teaspoons kosher salt
- ½ cup heavy whipping cream
- 4 ounces bittersweet chocolate finely chopped
- 4 ounces white chocolate finely chopped
Chocolate Ganache
- 4 oz bittersweet or semisweet chocolate
- ½ cup heavy cream
Instructions
Oreo Crust
- Preheat the oven to 350 degrees Fahrenheit.
- Finely crush the oreos using a food processor or place in a zip top bag and crush them using a rolling pin.24 Oreos
- Add the melted butter and mix well.5 tablespoons unsalted butter
- Pour the crumbs into a 9-inch springform pan and press into the bottom and about an inch up the sides, using your fingers or the bottom of a glass to press it down and to the sides firmly.
- Bake the crust for 10 minutes. Cool on a wire rack. Reduce the oven temperature down to 325 degrees.
Cheesecake Filling
- Prepare the springform pan for a water bath. Once the crust has cooled, wrap the springform pan with 2 layers of heavy-duty foil, wrapping and folding the edges at least ¾ up the sides of the pan. For an extra barrier, if desired, place an oven bag around the foil and tie it around the foil to secure it.
- Combine the softened cream cheese and sugar in the bowl of a stand mixer with a paddle attachment (or use a hand mixer) and mix on medium until smooth, about 2-3 minutes scraping the sides of the bowl occasionally.32 ounces (4-8oz packages) cream cheese, 1 cup (200 grams) granulated sugar
- Add the eggs one at a time, mixing well after each.4 large eggs
- Add the vanilla and salt and mix well.2 teaspoons vanilla extract, ½ teaspoons kosher salt
- Add the heavy whipping cream and mix until combined.½ cup heavy whipping cream
- Evenly divide the batter between 2 medium bowls.
- Melt the bittersweet chocolate in a heatproof bowl in 20 second increments in the microwave, stirring after each time until completely melted.4 ounces bittersweet chocolate
- Melt the white chocolate in another heatproof bowl in the same way.4 ounces white chocolate
- Pour the bittersweet chocolate into one bowl of the cheesecake mixture, mixing well. Pour the melted white chocolate into the other bowl of cheesecake batter and mix well.
- Pour the white chocolate cheesecake batter into the prepared pan over the crust. Smooth the top.
- Gently spoon (I use an ice cream scoop) the bittersweet chocolate batter over top of the white chocolate batter. Spoon it over the entire batter, trying to cover it completely. Use the back of a spoon or an offset spatula to gently smooth the top and cover the white chocolate layer completely.
- Place the springform pan into a roasting pan and place it in the oven. Carefully pour very hot water into the roasting pan until it comes about halfway up the sides of the springform pan being careful not to get any water between the pan and the foil.
- Bake the cheesecake at 325 degrees Fahrenheit for 65-75 minutes. If you have an instant-read thermometer, the temperature should be 150-155 degrees Fahrenheit in the middle. The cheesecake is done when the middle is still slightly jiggly but the edges are fully set.
- Turn the oven off and slightly prop open the oven door with a wooden spoon if it won’t stay open on its own. Allow to cool in the oven for 1 hour.
- Carefully remove the roasting pan from the oven and remove the cheesecake from the water. Remove the foil. Cool for 30 minutes to an hour on a wire rack.
- Place the cheesecake in the refrigerator, covering the top with foil or plastic wrap and chill at least 4 hours or overnight.
Chocolate Ganache
- Once the cheesecake is completely cooled, make the chocolate ganache. Place the chopped chocolate into a small bowl and set aside.4 oz bittersweet or semisweet chocolate
- Warm the heavy cream in a small saucepan until it just starts simmering at the edges of the pan. Do not boil it.½ cup heavy cream
- Pour the warmed heavy cream over the chocolate and place a plate or foil over the bowl. Let it sit for 2-3 minutes and then stir it until the chocolate is completely melted and the ganache is slightly thickened and shiny.
- Pour the ganache over the top of the cheesecake and spread it evenly. Refrigerate the cheesecake for another hour to set the ganache before slicing it. Decorate the top with chocolate curls if desired.
Notes
- Store leftover cheesecake in the refrigerator for up to 4 days. It can also be frozen and thawed overnight in the refrigerator.
- Semi-sweet chocolate can be used instead of bittersweet if desired.
Linda Grouell says
The instructions are slightly confusing.
#4 in the cheesecake filling says: ‘and the slightly cooled chocolate and mix well’, but the two chocolates don’t get melted and added until after the filling is split in step 9.
Then, the bittersweet chocolate filling is poured over the crust, followed by the white chocolate filling, unlike the pictures which show the white chocolate layer on the bottom. Does it matter which order they are? I assume it doesn’t, but it doesn’t correlate to the pictures.
Clarification please.
Thanks.
Tara Kringlen says
Hi Linda,
That was a typo that you found so it is fixed now. Also, the pictures are different than the instructions but it doesn't matter which way you do it. Thanks!
Elizabeth Miller says
This one is over the top delicious. It’s worth following all the tips and time it takes.
Tara Kringlen says
Thanks Elizabeth!
Ness says
I did the crust how it says, 10 minutes in oven I only had 21 oreo cookies and put the same amount of butter and it melted into a goo, not even staying up the sides its just all melted, I think its salvageable but I dont know how I could of avoided this.
Tara Kringlen says
I'm sorry this happened! I've had a tiny bit of butter oozing out but not the crust falling down the sides. I wouldn't think just 3 oreos would make that big of a difference, but perhaps it did.