
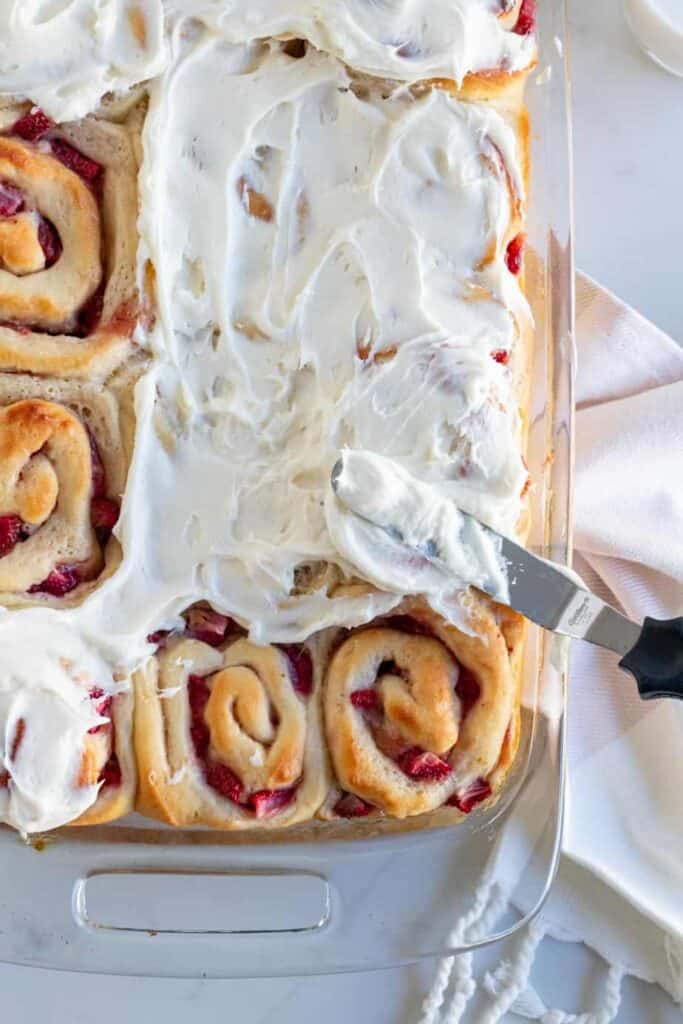
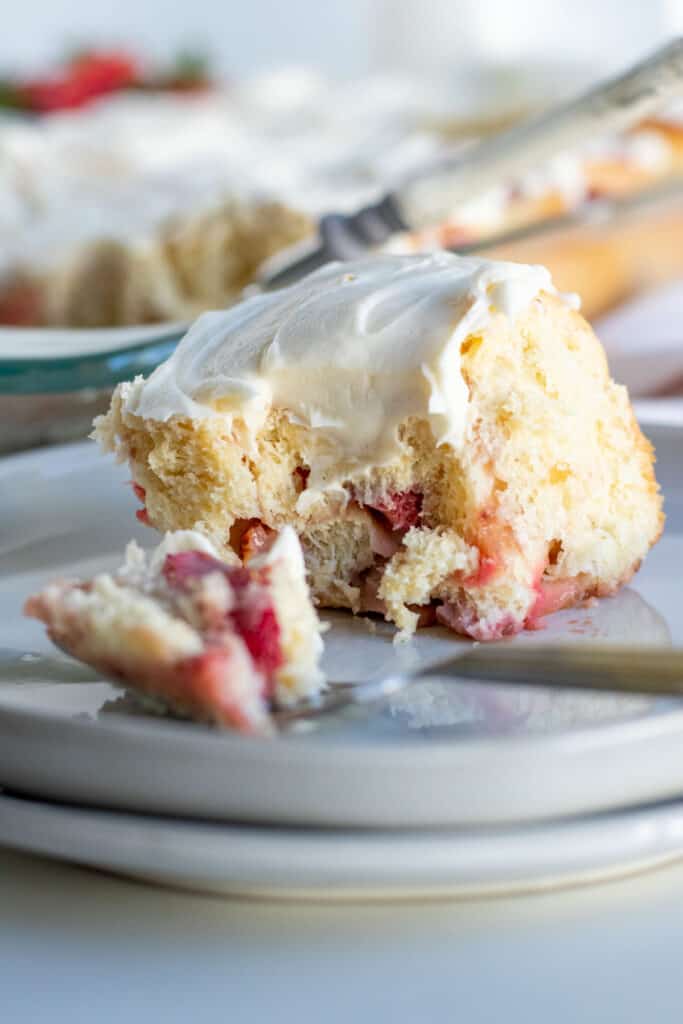
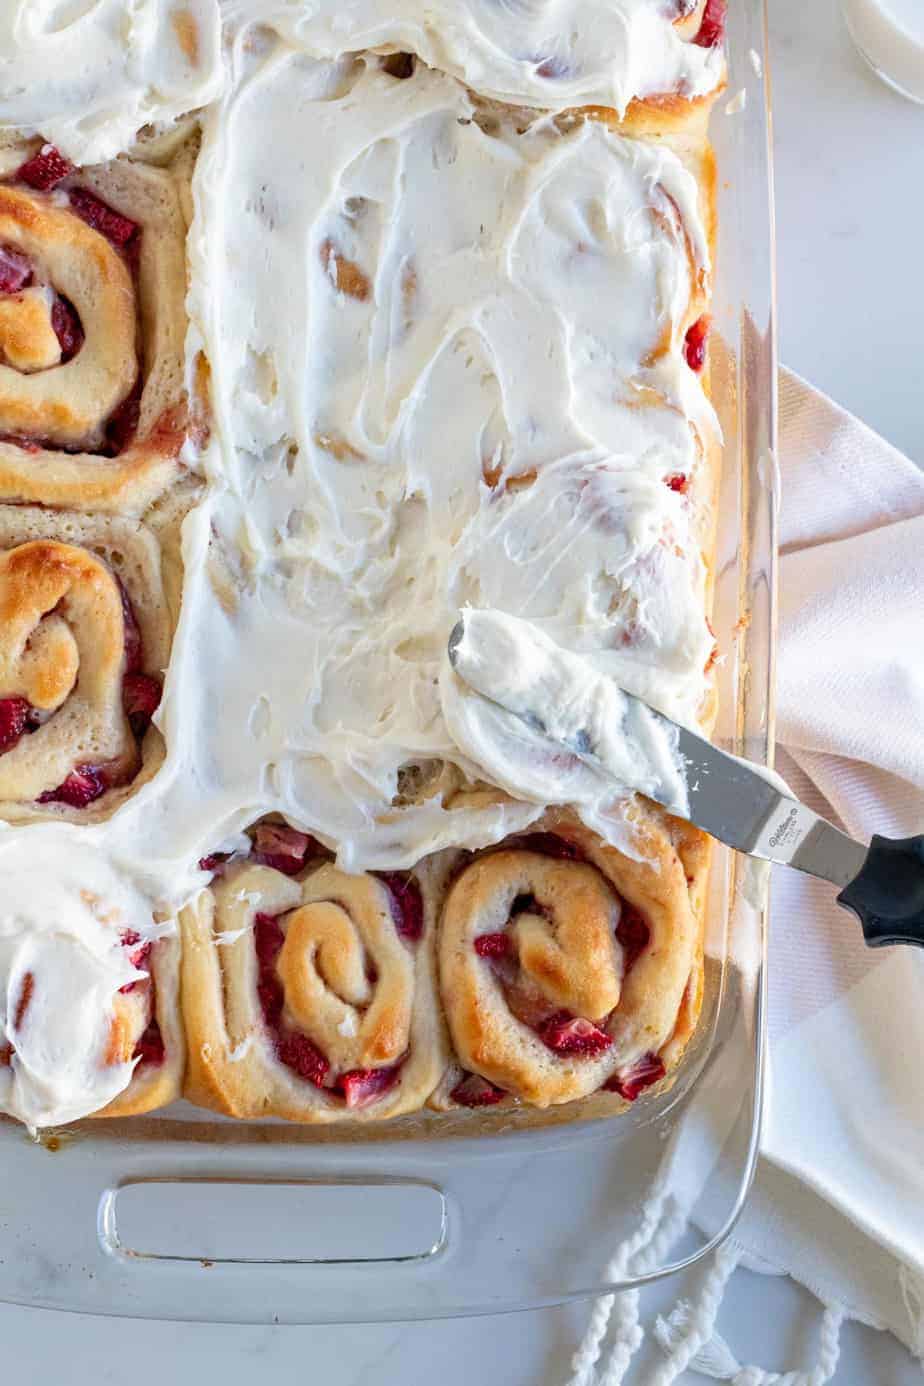
These strawberry rolls with cream cheese frosting are a riff on classic cinnamon rolls minus the cinnamon filling. A decadent brioche dough is spread with purchased strawberry preserves and lots of ripe chopped strawberries. These sweet rolls get spiraled into a bakery sized roll and then get covered in a healthy amount of cream cheese frosting.
Guys, I'm on day 3 of potty training. I'm also 33 weeks pregnant and can't drink once my toddler goes to bed. Why did I decide to do this again? Oh right...because we are in the midst of a pandemic and basically home bound. Ugh. Well at least I have strawberry rolls with loads of cream cheese frosting to eat my emotions away during these tenuous times. Pray for me.
How are these different than cinnamon rolls?
These strawberry rolls use the same dough as my recipe for apple cinnamon rolls. It's a brioche-style dough which is considered a "rich dough" due to a higher fat content. That means lots of butter :-). Some cinnamon roll recipes have butter in the dough and others don't. I prefer butter due to the softness and taste it imparts to the dough and I just look away from the calorie content when I want to indulge in one!
Brioche dough also includes milk instead of water. Not all cinnamon roll recipes will use milk. Again, it just makes the dough richer. Instead of more butter and the cinnamon-sugar mixture in cinnamon rolls, we will swap in strawberry preserves and chopped strawberries for this recipe. They both get covered in a sweet cream cheese frosting.
How to proof the yeast
To start this recipe, we need to start with the dough. This is a yeasted dough but don't fear yeast if you've not worked with it before or had a bad experience. Follow my steps exactly and I promise you'll have yummy strawberry rolls in your future!
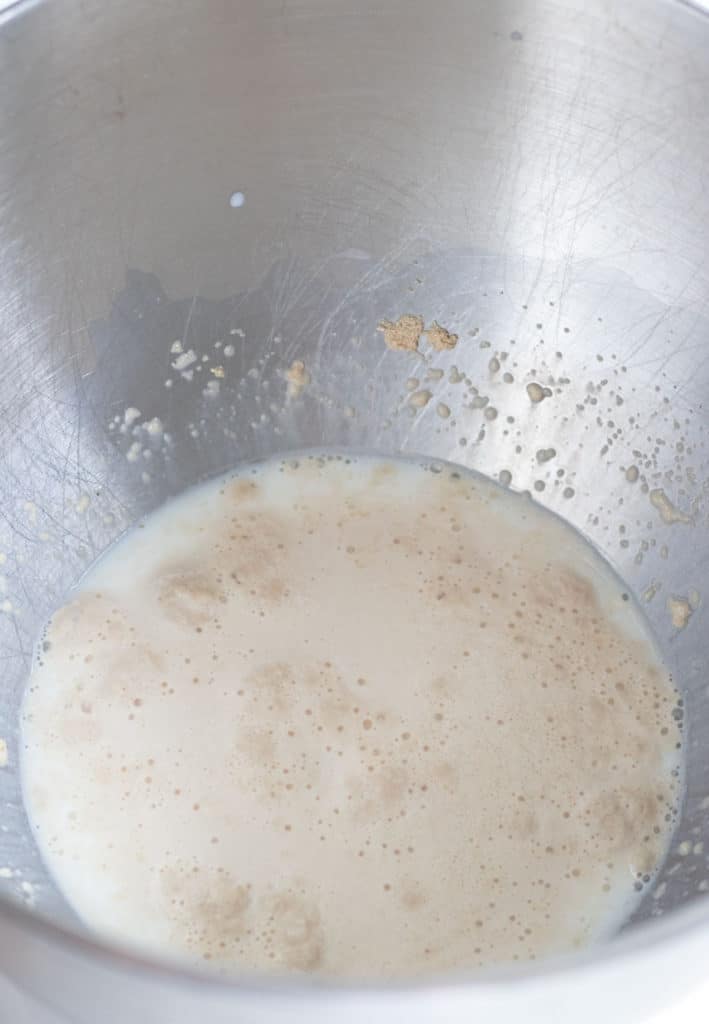
Proofing your yeast simply means that you are making sure the yeast is alive before combining it with the other ingredients. If for some reason (milk too hot, yeast old, etc) the yeast didn’t foam after following the steps below, then you want to start over with new yeast.
To proof the yeast, warm some milk in the microwave or on the stove until it reads 100- 110 degrees. Then you’ll add this warmed milk and 1 teaspoon of sugar to the bowl of a stand mixer and sprinkle the yeast over the top. You’ll stir it into the milk and let it stand for about 5 minutes until it is foamy on top. This tells you that your yeast is good and you can proceed with the recipe.
How to make the dough
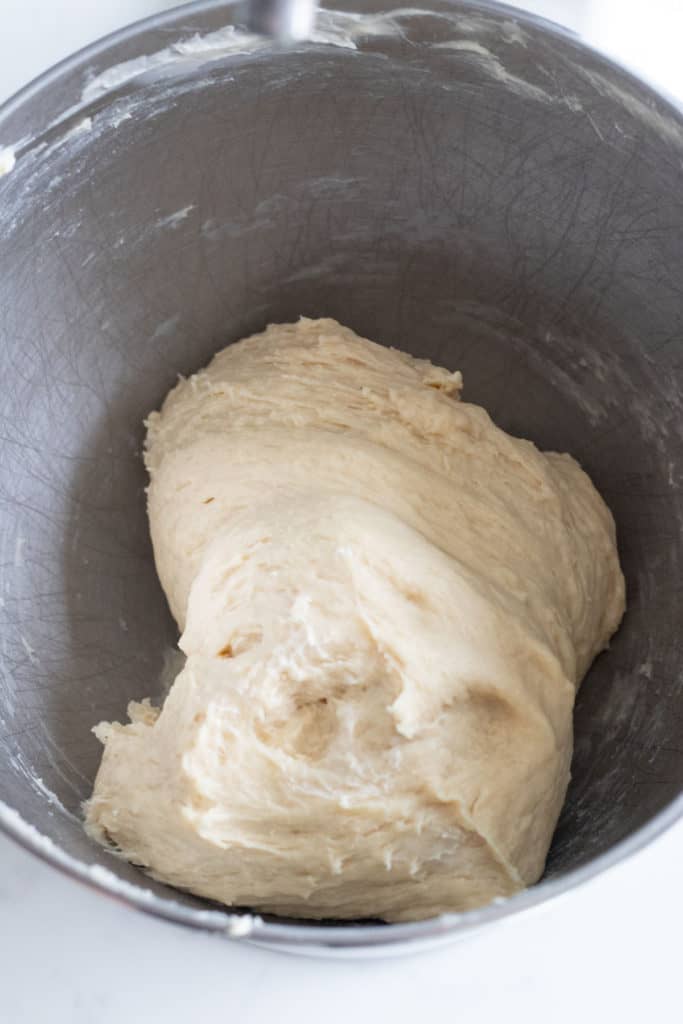
Once you've proofed the yeast, the rest is really simple. Mix in your eggs, vanilla, flour, sugar and salt to the yeast mixture and then let the mixer do the magic. Start on low speed and gradually increase the speed to medium once the ingredients are combined for about 5 minutes until the dough is smooth.
Next, you’ll add in the very room temperature butter and mix for another 4 minutes until the butter is incorporated. Scrape the sides of the bowl one or two times during this process as butter will coat the bowl. If the dough seems too sticky toward the end of the 4 minutes, you can add more flour one tablespoon at a time. It will be a soft dough so don't add too much extra flour.
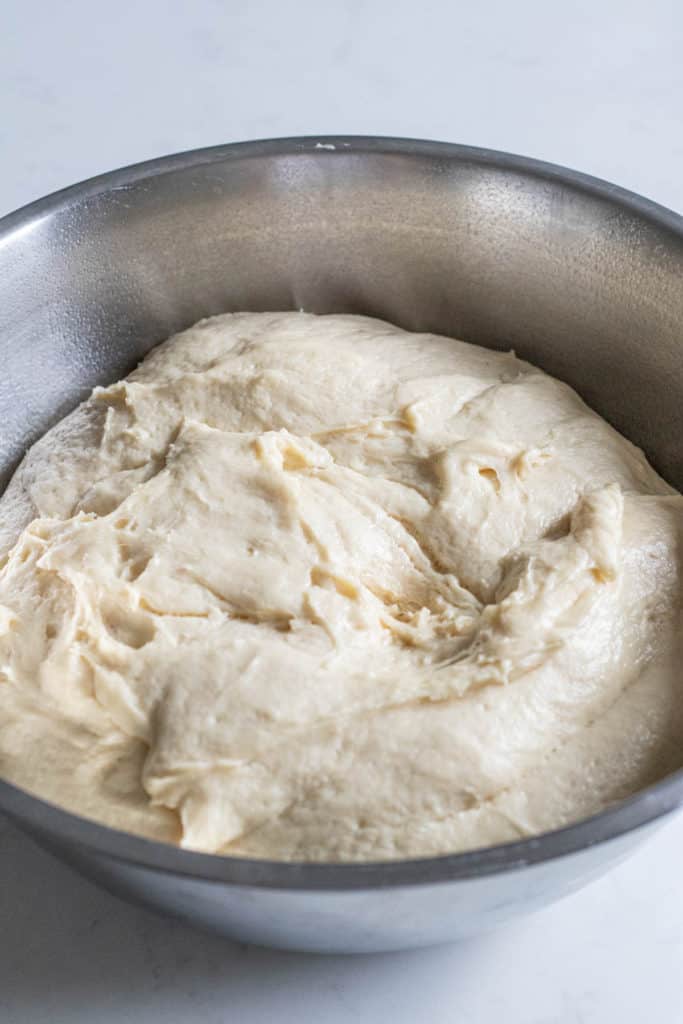
Spray the dough with a bit of cooking spray or a tiny drizzle of olive oil and turn it around in the bowl to coat it. Cover the bowl with plastic wrap and let rise in a warm place for an hour to an hour and a half until it’s doubled in size.

Dough after mixing in all dough ingredients. Dough after rising for 1-1.5 hours.
Assembling the rolls
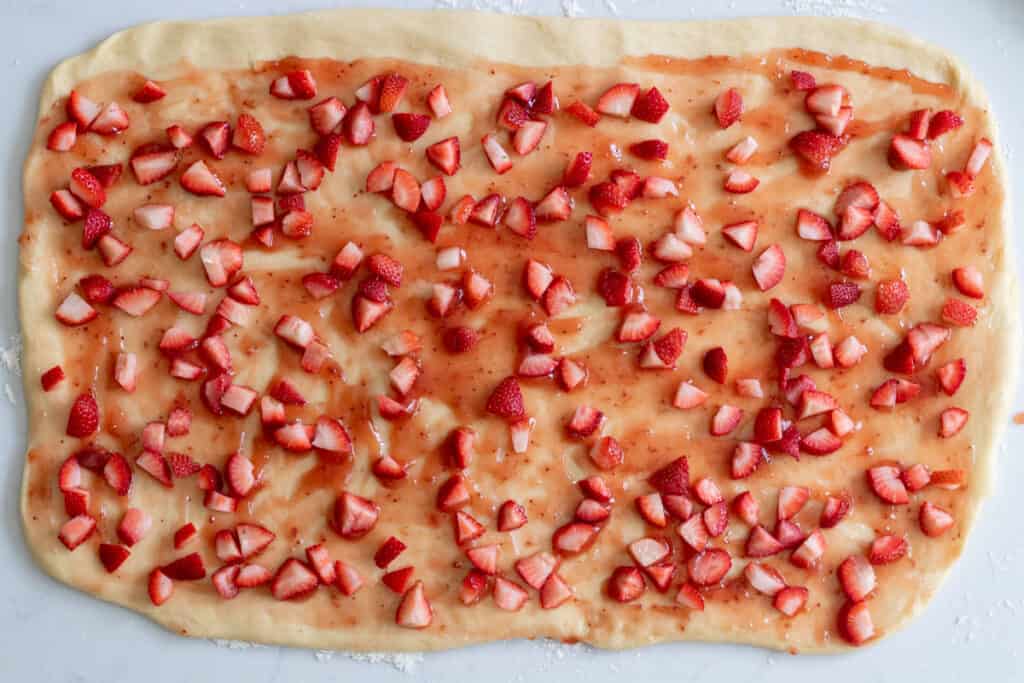
Once the dough has doubled in size, dump it out onto a lightly floured counter and roll it out to a 12 x 21 inch rectangle. Next, you’ll spread the strawberry preserves onto the dough, spreading all the way to the edges except for one long edge where you’ll leave a ½ border. This will help the filling from not spilling out when you roll up the dough. If you'd like to make your own strawberry preserves, go for it! I chose the quicker route this time and used a good quality purchased preserve.
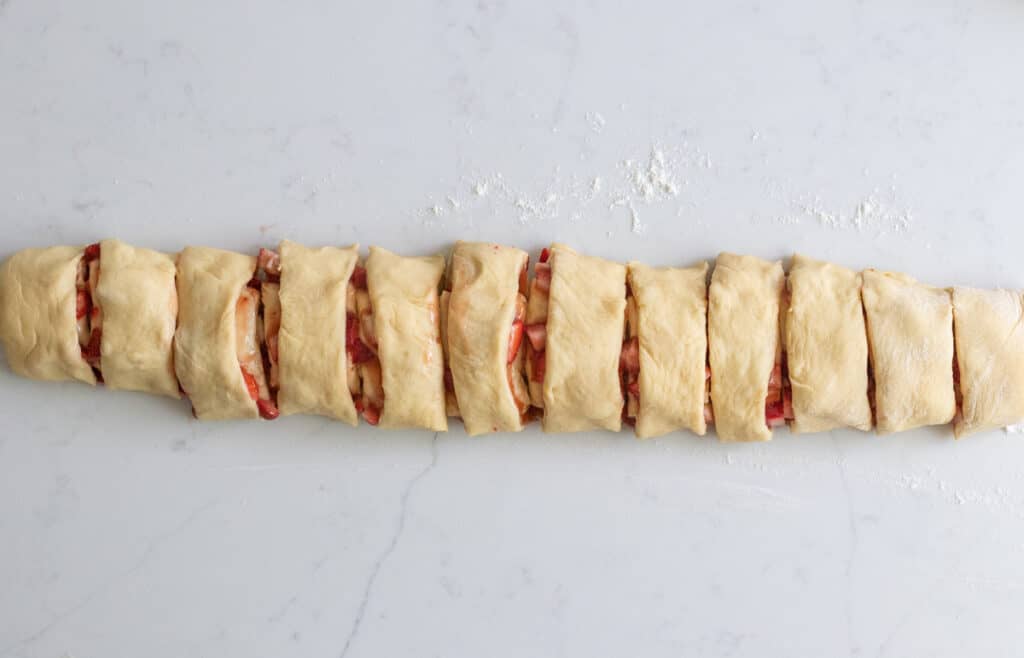
Scatter the chopped strawberries evenly over the preserves. Starting at the long edge without the border, roll the dough into a tight log, pressing the seam together at the end.
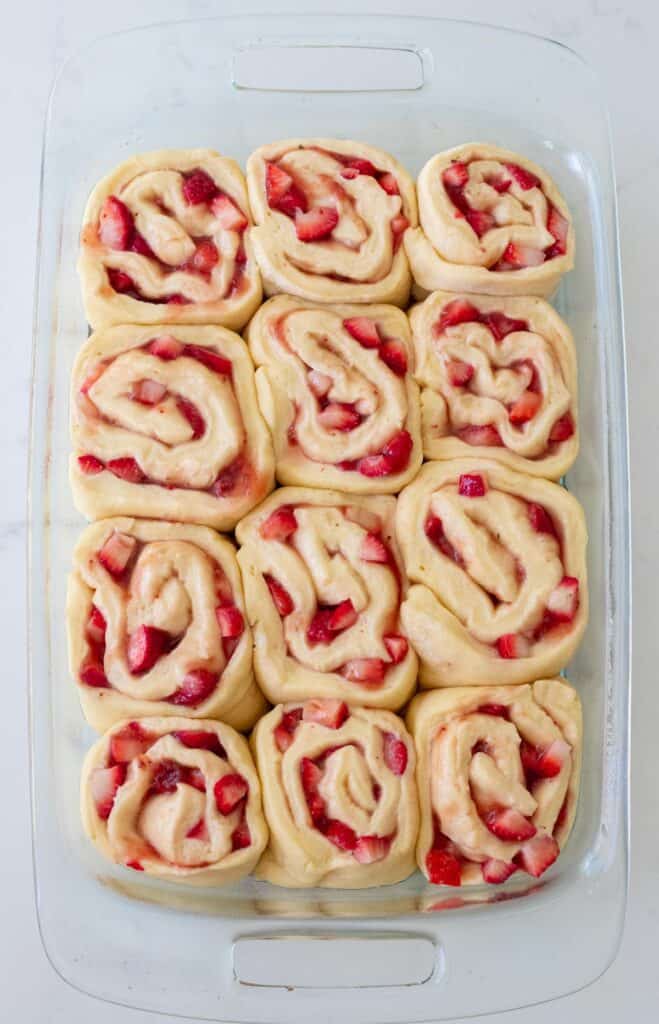
Cut the roll into 12 even rolls. I like to cut once in the middle of the roll and then cut each of those halves in half. You’ll then have 4 halves. Cut each into 3 rolls that are 1.5 inches thick. You can also use floss to cut the rolls a bit easier. Make sure to use unflavored floss! You'll slide the floss under the roll and then cross the two sides over each other to make the cut.
You’ll place the rolls in a 9 x 13 pan coated with cooking spray and let them rise in a warm place for about an hour until they are puffy and mostly touching in the pan. They are ready to be baked and slathered in cream cheese frosting!
How to store the rolls
If you aren’t eating all of these in one sitting, they will thankfully keep for multiple days. You can keep them in an airtight container on the countertop for 2-3 days. If you plan to keep them longer than that, place the airtight container in the refrigerator for up to 6-7 days.
They will start to dry out toward the end of this time frame but I found that placing them in the microwave for 20-30 seconds helped a lot!
Can I freeze these?
Yes! There are two ways you can do this.
- You can bake the rolls, cool them and freeze them either individually by wrapping them in plastic wrap and foil or wrapping the whole pan in plastic wrap and foil before freezing. You’ll want to thaw them in the refrigerator overnight and then heat them up in the microwave before eating.
- You can make the rolls through cutting them and placing them in the pan. Instead of letting them rise and then baking them, wrap the pan tightly in plastic wrap and foil and freeze. The day before you want to bake them, let them thaw overnight in the fridge. The day you bake them, remove the thawed rolls from the fridge and let rise in a warm place until about doubled in size, about an hour. Then bake as directed. They should last about 1 month in the freeze this way
How to make overnight sweet rolls
If this is too much of a project to tackle in one day or you'd like those strawberry rolls to be baked fresh the morning of serving, follow these steps to make them overnight.
- Make the dough and let it rise in the bowl until doubled, 1-1.5 hours
- Roll it out and fill it as described above and then cut the rolls and place in the baking dish
- Instead of letting them rise a second time, cover the pan with plastic wrap or foil and place into the refrigerator overnight
- The next morning, remove the rolls from the fridge and let them rise for about an hour until puffy and touching
- Bake and frost as directed!
For more recipes that you may like, check out:
Tag me on Instagram @themarblekitchenblog if you make this and leave a star rating and comment below! Thank you and enjoy!
Strawberry Rolls with Cream Cheese Frosting
Ingredients
Dough
- 4 cups all purpose flour
- ⅓ cup sugar + 1 tsp divided
- 1 teaspoon kosher salt
- 1 pkg active dry yeast about 2 ¼ tsp
- 1 cup warm milk about 100-110 degrees
- 2 eggs
- 1 teaspoon vanilla
- 10 tablespoon unsalted butter very soft and cubed
Filling
- ¾ cup strawberry preserves
- 2 cups strawberries chopped into ¼ inch pieces
Frosting
- 5 oz cream cheese room temperature
- 5 tablespoon unsalted butter room temperature
- 2 cups powdered sugar
- 1 teaspoon vanilla extract
Instructions
Strawberry Rolls
- Whisk together flour, sugar and salt in a bowl. Warm milk in the microwave for about 45 seconds or until a thermometer reads 100 to 110 degrees. Add milk and 1 teaspoon of sugar to the bowl of a stand mixer fit with a dough hook. Sprinkle the yeast over the milk and stir to combine. Let stand for about 5 minutes until the yeast starts to foam.
- Add the eggs, vanilla and then the dry ingredients to the yeast mixture. Mix on low speed until combined and then increase speed to medium and mix for about 5 minutes until the dough is smooth.
- Add butter and mix on medium about 4 minutes until butter is incorporated and dough comes together but is sticky. Scrape down the sides of the bowl as needed during mixing.
- Spray the dough with cooking spray or a rub a small drizzle of olive oil over it, cover the bowl with plastic wrap and let rise in a warm place for 1 to 1 ½ hours until the dough is about doubled.
- Punch down the dough and scrape out onto a lightly floured surface.
- Roll dough out into a 12 x 21 inch rectangle. Spread strawberry preserves onto the dough all the way to the edges except one long edge leaving about a 1 inch border.
- Scatter the chopped strawberries evenly over the dough.
- Starting from the long edge without the border, roll into a tight log, pressing the seam together at the end. Cut into 12 slices about 1 ½ inches thick each.
- Spray a 9 x 13 pan with baking spray and arrange the rolls in the baking pan. Cover with plastic wrap and let rise in a warm place for about an hour or until puffy and mostly touching in the pan. See notes or the post above for directions for overnight rolls.
- Bake at 375 degrees until golden brown, about 23-25 minutes. Either frost the hot rolls if you prefer melted frosting or cool completely and then frost for unmelted frosting.
Frosting
- Beat together butter and cream cheese until smooth and creamy. Add vanilla and powdered sugar and beat until smooth.
Notes
- For overnight rolls, at step 9, instead of letting the rolls rise the second time, place the covered pan in the refrigerator overnight. The next morning, remove the pan from the fridge and allow to rise in a warm spot for about an hour or until the rolls are touching each other in the pan and puffy. Bake and frost as directed.
- To store the rolls, keep on the counter for 2-3 days in an airtight container. They will last about 6-7 days tightly covered in the fridge and are best eaten after being heated in the microwave for about 20-30 seconds as they will get drier from refrigeration.
- See the post for additional details on freezing!

Leave a Reply