
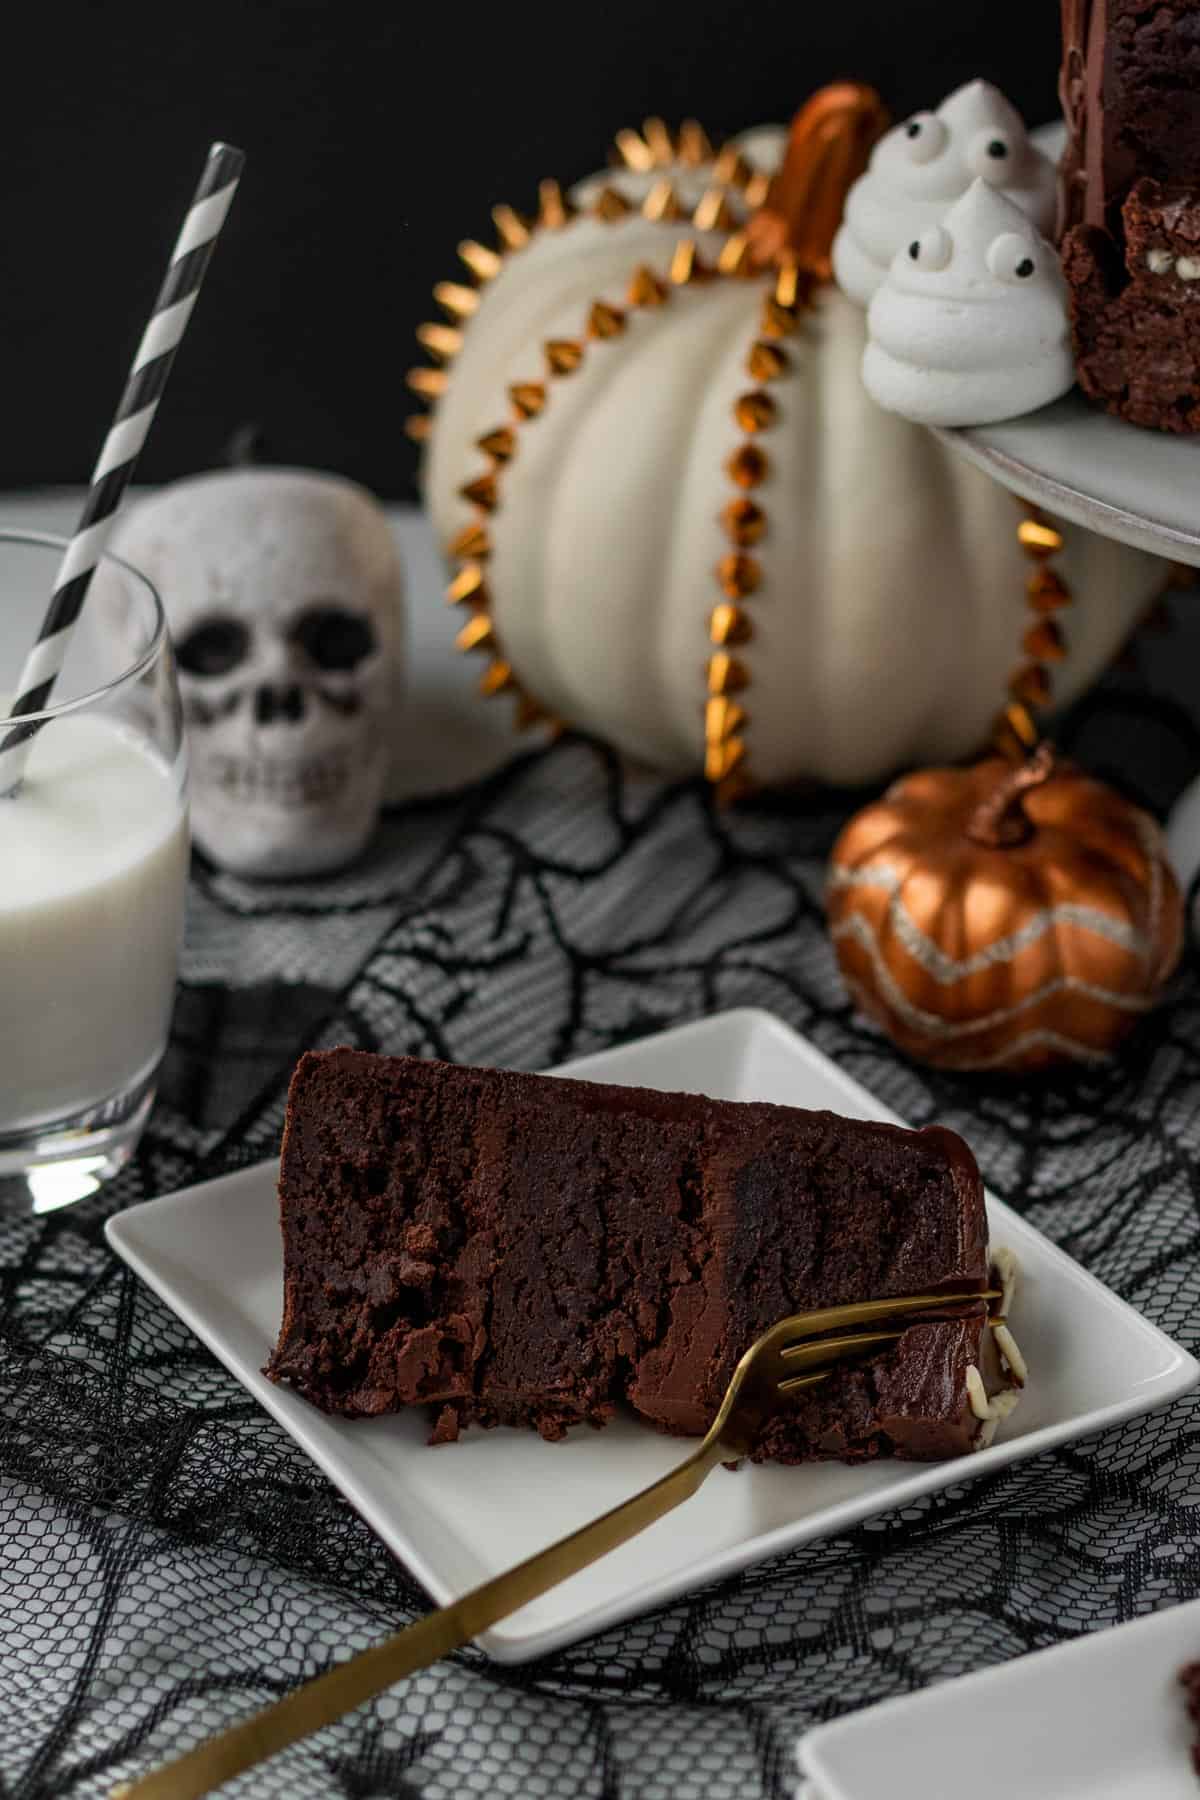
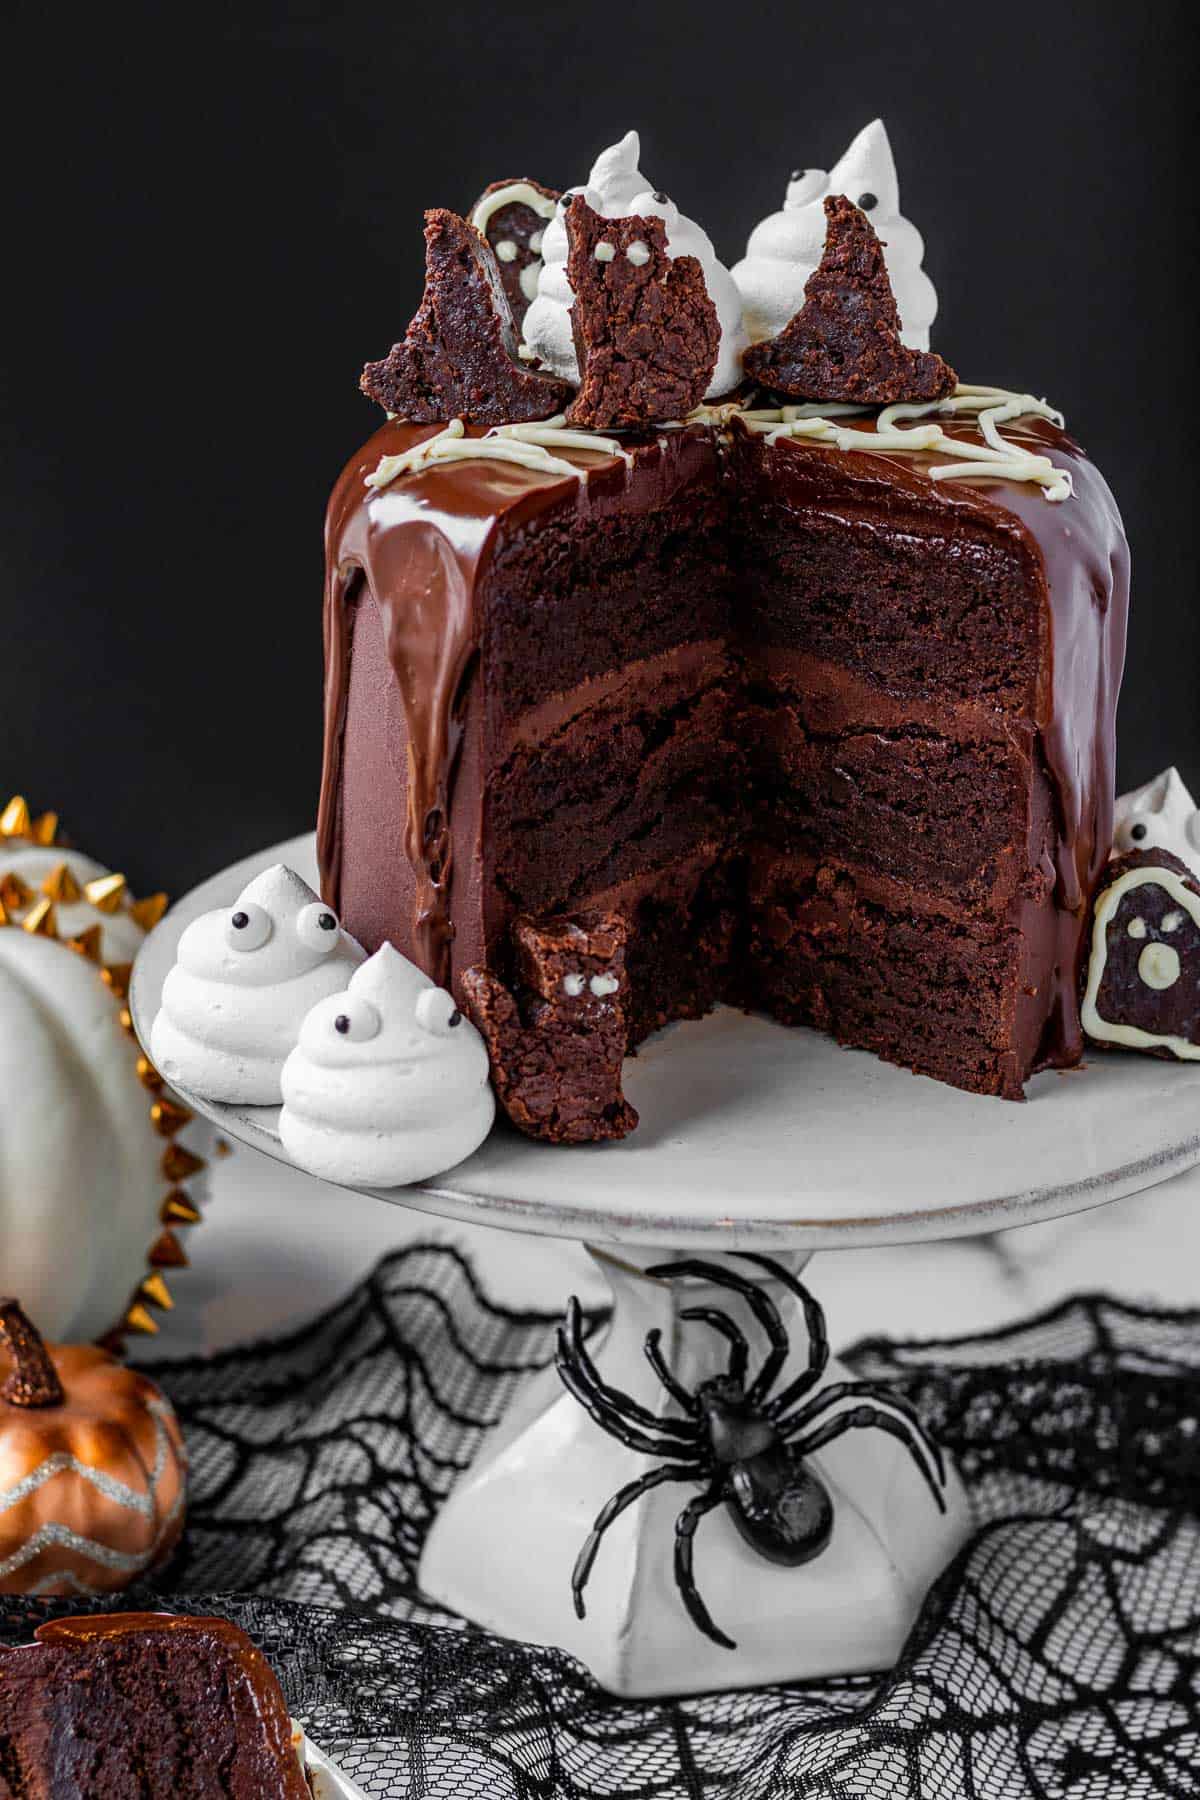
Three layers of rich, fudgy brownies form the base of this chocolate brownie cake. The cake is frosted with a silky smooth double chocolate buttercream frosting and covered in shiny chocolate ganache. Every bite is filled with indulgent chocolate deliciousness!
What is a brownie cake?
A chocolate brownie cake is a cross between cake layers and brownies. I actually used my go-to brownie recipe and tweaked it slightly to add more cake-like features to it.
Don't be fooled though! While it's called a cake, the layers are much more dense and fudgy than a typical cake would be. There are loads of eggs and a healthy dose of chocolate in the batter.
Unlike a traditional brownie, there is a leavener in the recipe- baking powder. This helps create a bit of lift in the cake.
This chocolate brownie cake is REALLY rich! A small piece goes a long way and will definitely fill any chocolate fix you've got.
Tips for making this cake
- Two types of chocolate: For an extra rich and fudgy chocolate brownie cake, both cocoa powder and melted bittersweet chocolate is added. Any unsweetened cocoa powder is fine in this recipe. To easily chop the chocolate, use a serrated knife (or bread knife) to chop it. It's much easier than a regular knife!
- Use parchment paper: For ease of removing the cakes from the pans, line the bottom of the pan with a round of parchment paper. Place you cake pan on top of the parchment and then trace around the bottom of the pan. Cut three of these rounds out. Spray the pan with cooking or baking spray first and then place the parchment round in the bottom. The cooking spray will help hold the parchment down.
- Espresso Powder: Espresso powder is a secret weapon in chocolate recipes. While you won't taste the espresso in the brownie, the powder deepens and intensifies the chocolate flavor. If you can't find espresso powder, you can leave it out without too much difference in the end product but I urge you to try it. This is my favorite espresso powder and I can usually find it in my local grocery store.
- Don't overbake: One of the main keys to achieving fudgy brownies is not overbaking them. Start checking them at 25 minutes by inserting a toothpick into the middle. If the toothpick comes out with shiny batter clinging to it then it needs more time. You want moist crumbs sticking to the toothpick. It's better to underbake these than overbake. As the cakes cool, they will firm up more.
Double Chocolate Frosting
The cake is frosted in a rich chocolate frosting. Similar to the brownie cake layers, the frosting also uses both cocoa powder and melted chocolate for the biggest impact.
It's a pretty traditional buttercream frosting with lots of unsalted butter and powdered sugar combined with the 2 chocolates and some heavy whipping cream. The heavy cream gives the frosting a little more fluffiness and lightness.
The recipe makes enough frosting to generously frost and fill a 3 layer 6-inch cake.
Chocolate Ganache
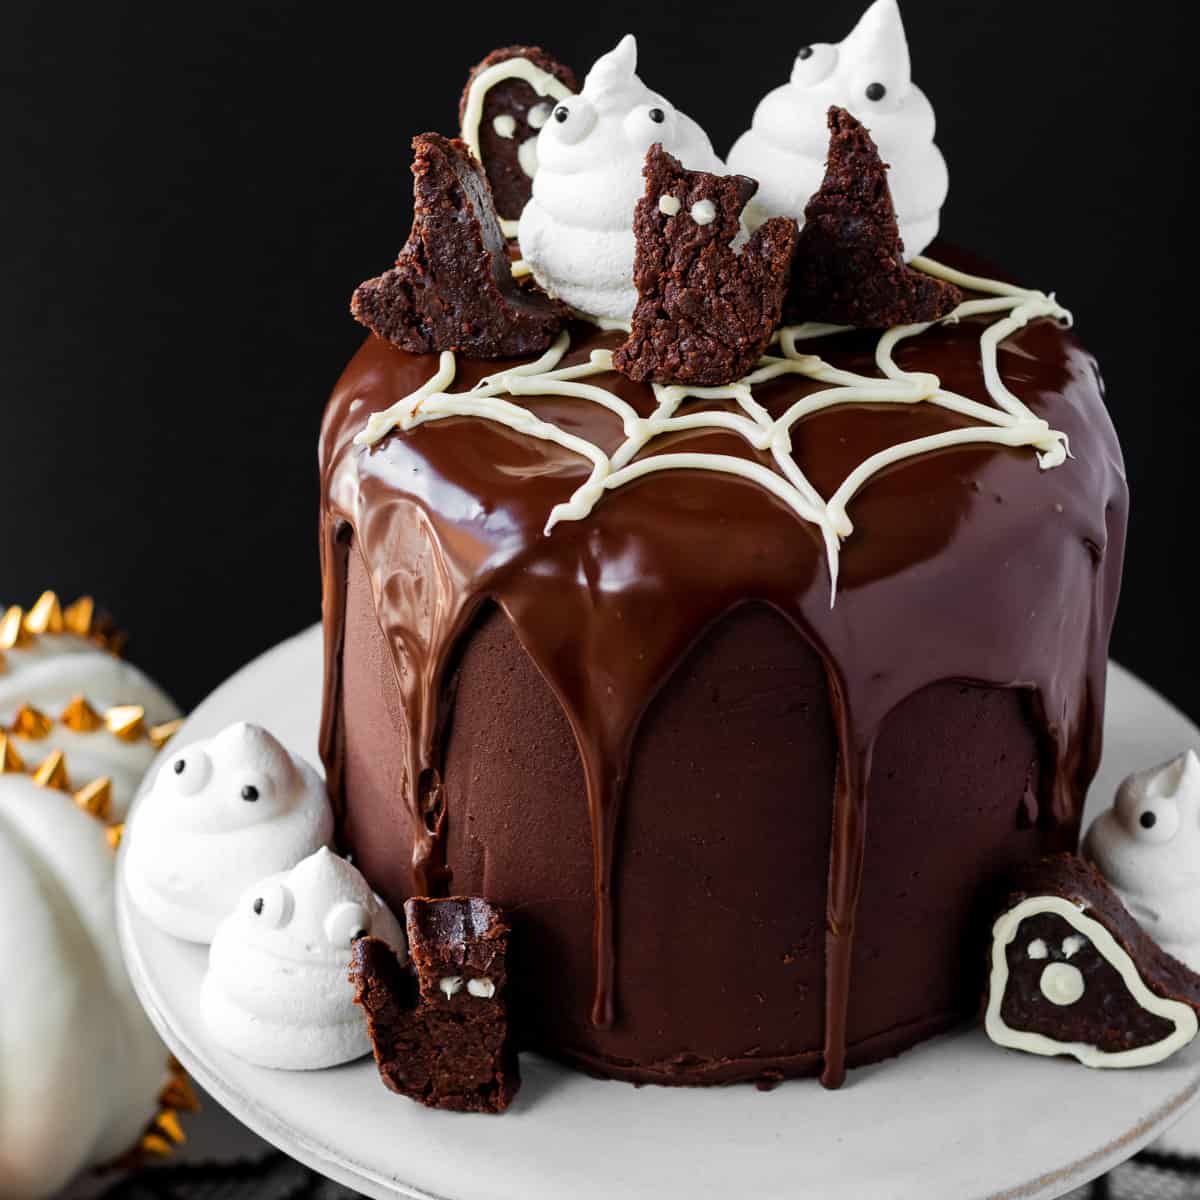
For that shiny chocolate finish, I use a chocolate ganache to drip over the top and sides of the cake. It's simply equal parts of heavy whipping cream and melted chocolate combined and then poured over the top of the cake.
I used bittersweet chocolate but you can also use semi-sweet chocolate if you prefer. Milk chocolate would be pretty darn sweet on top of the rest of the cake components so I would stick with bittersweet or semi-sweet.
If the ganache isn't a good pourable or drippable consistency, you can add a bit more heavy cream to thin it out if necessary.
How to make the cake in advance
If a layer cake seems like a big project to you, then you can split up the components and make them over time. You can make the cake layers up to 2 days in advance. Simply bake them as normal, let them cool completely and then wrap each layer in plastic wrap and store them in the refrigerator until you are ready to use them.
They could also be frozen but make sure to also wrap them in foil before putting them in the freezer. You can freeze for up to a month and then defrost the layers in the refrigerator overnight.
The frosting can also be made a day ahead and then stored in a covered container in the refrigerator. Remove the frosting from the refrigerator for 15 to 30 minutes before you are ready to use it. Whip the frosting with an electric mixer/stand mixer until it's light and fluffy again.
Make the ganache right before you are ready to use it, so save that step for last.
If you are decorating the cake for Halloween, the meringue ghosts can also be made up to 3 days in advance and stored in a container at room temperature. If you are also making the brownies for the Halloween decor, then those can be made up to 3 days in advance as well, again stored in a covered container at room temperature.
The cake can also be filled and frosted up to 2 days before serving it and stored in teh fridge. It's a good idea to store it in a cake container like this one so it's completely covered while in the fridge. If you don't have one, then try to wrap it loosely in foil after it's chilled for an hour in the fridge so you don't mess up the frosting.
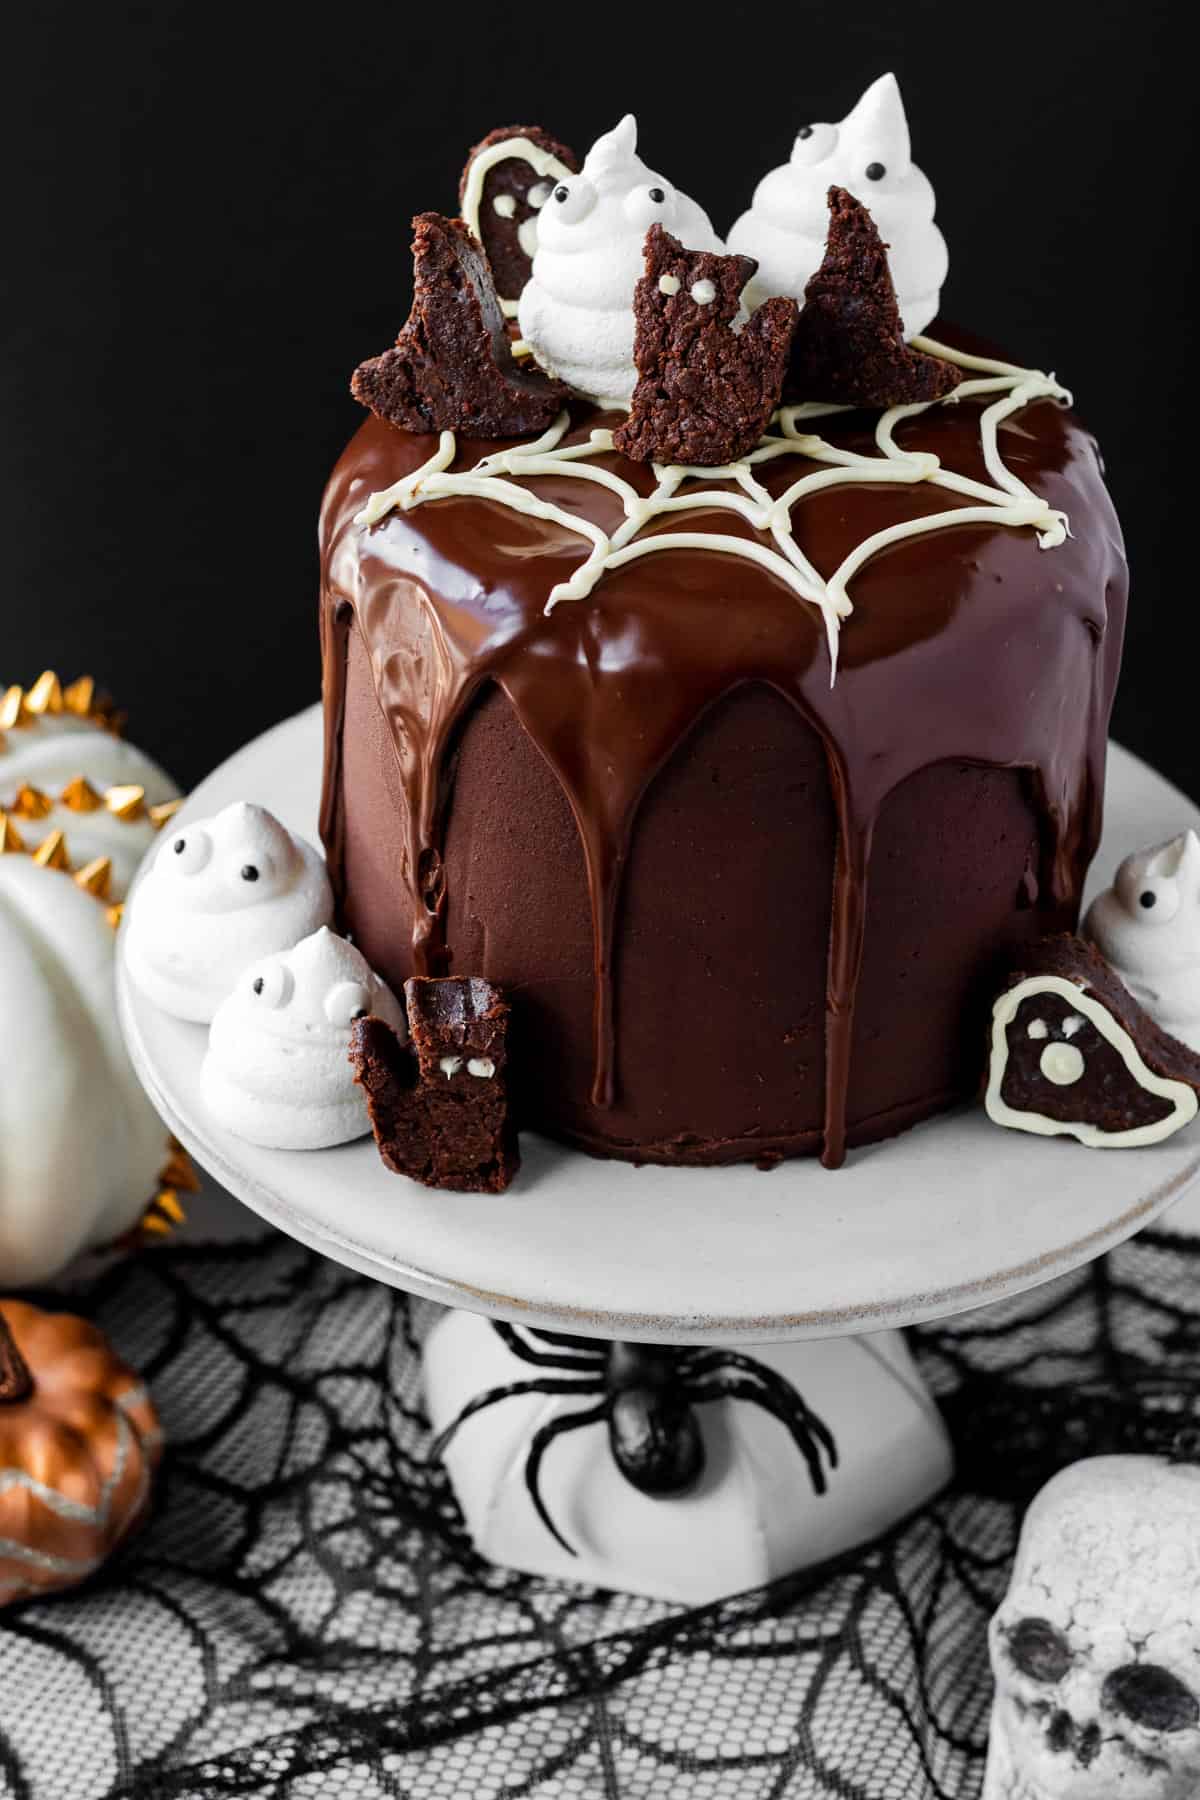
Decorating the cake for Halloween
I decorated this chocolate brownie cake for Halloween. The components of the cake decor are:
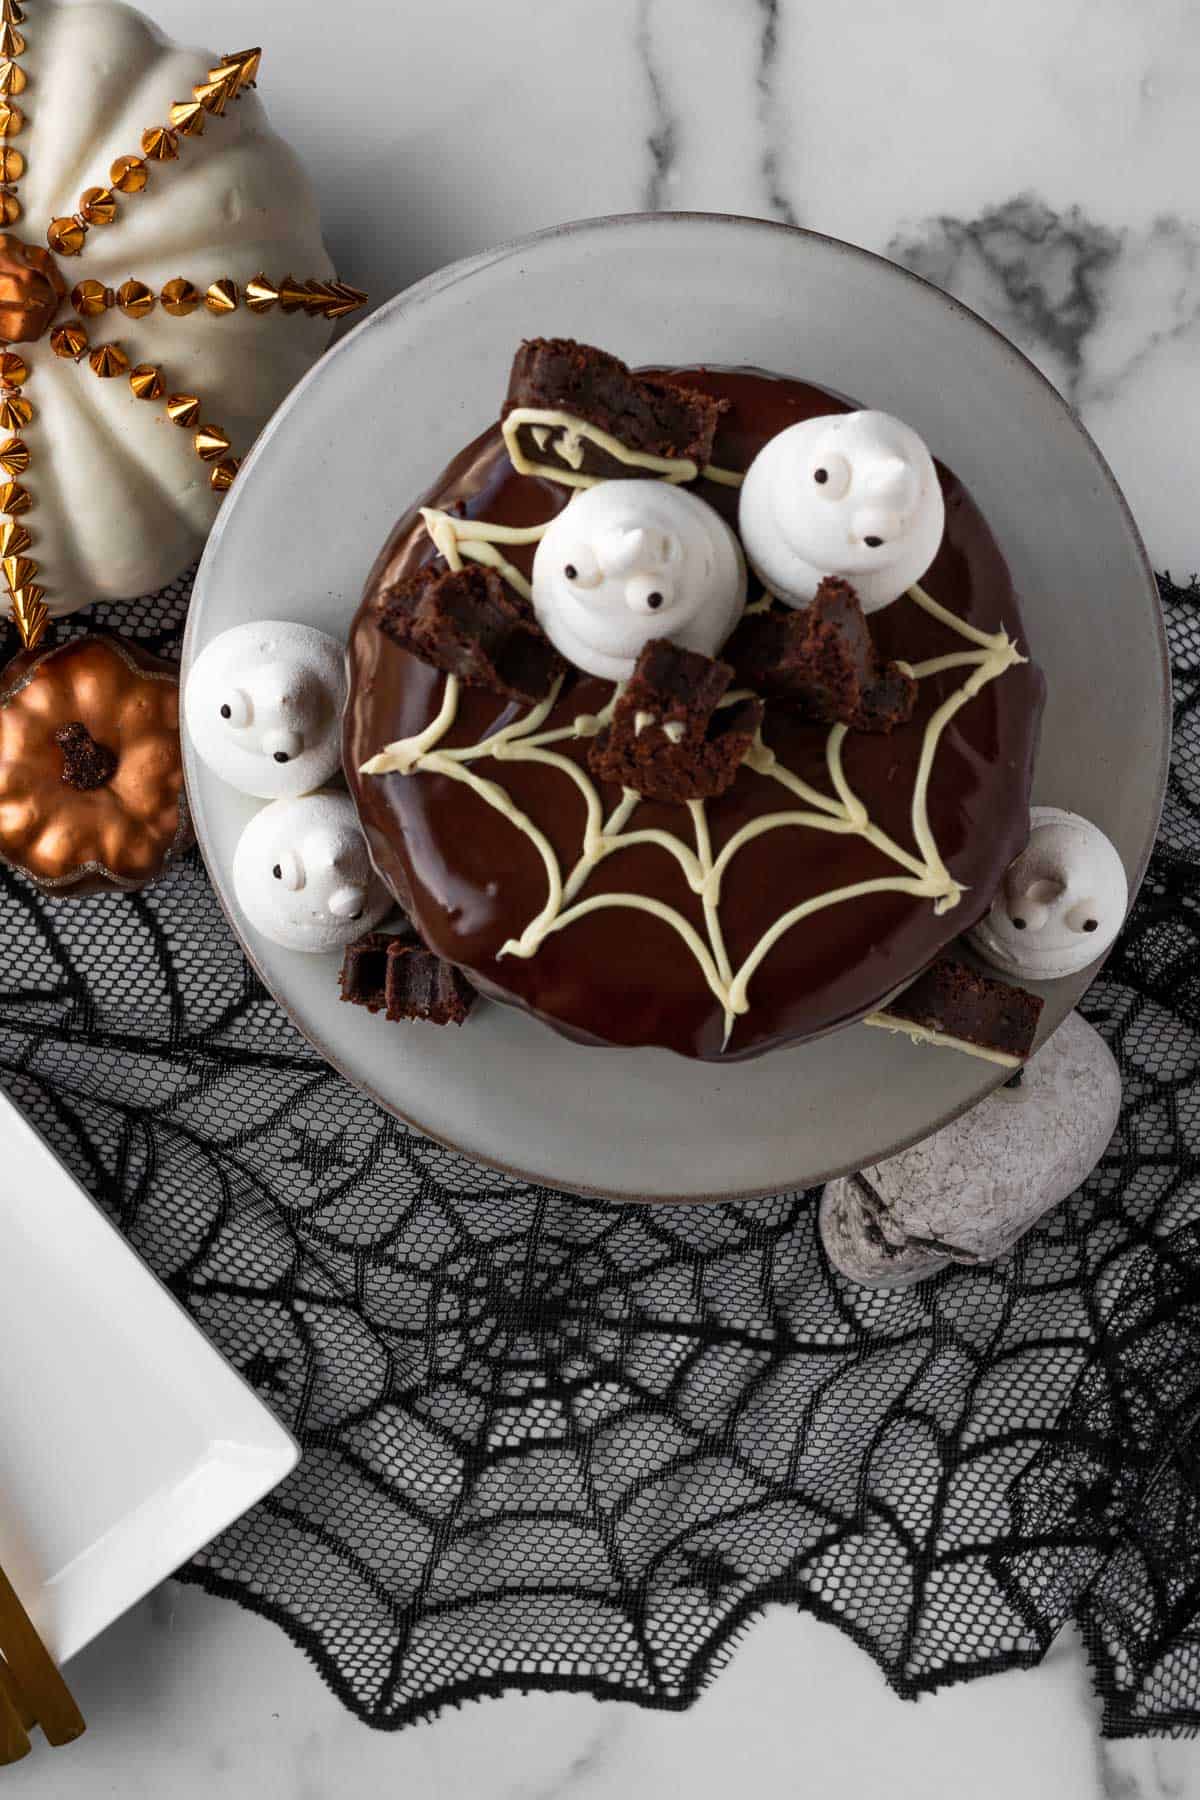
- White chocolate spider web: I melted white chocolate chips in the microwave and then filled a piping bag (you can also use a zip-top bag and snip the corner a teeny bit). I piped a spider web design on top of the chocolate ganache.
- Meringue ghosts: These cute little ghosts are made out of a simple meringue from whipped egg whites and sugar. I added candy eyes to the meringues before they went into the oven. More on these below!
- Halloween cut-out brownies: If you really want to go over the top, then bake a pan of brownies (store-bought is fine!). Let them cool completely and then use cute but small Halloween cookie cutters to cut out fun shapes. I also used the melted white chocolate from the spider web to outline some of the shapes and add eyes and a mouth to the ghosts
How to make meringue ghosts
The meringue ghosts are pretty simple to make. Beat egg whites, cream of tartar and vanilla extract until frothy and then add the sugar slowly. This is easiest to do in a stand mixer but you can used an electric mixer if you don't have a stand mixer.
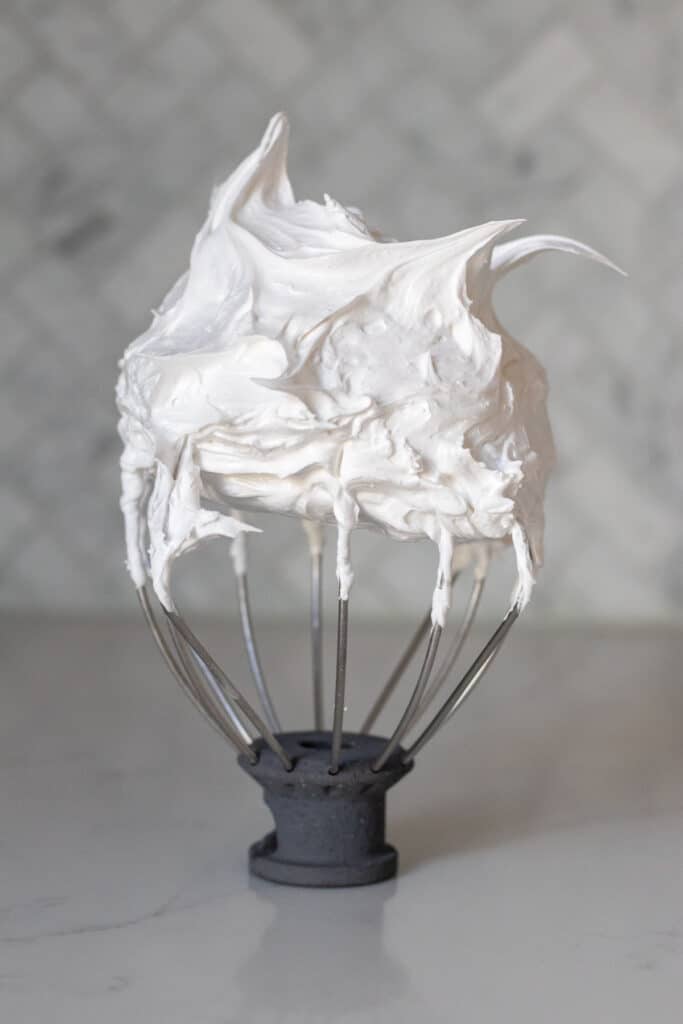
Whip the egg whites to stiff peaks and ensure the sugar has completely dissolved. See the picture of the whisk below to see what stiff peaks look like.
If you turn your whisk upside down, the meringue would stay pointing up instead of drooping down. To check if the sugar has dissolved, put a little meringue between two fingers and rub them together. Keep whipping if it is gritty, as it's not fully dissolved.
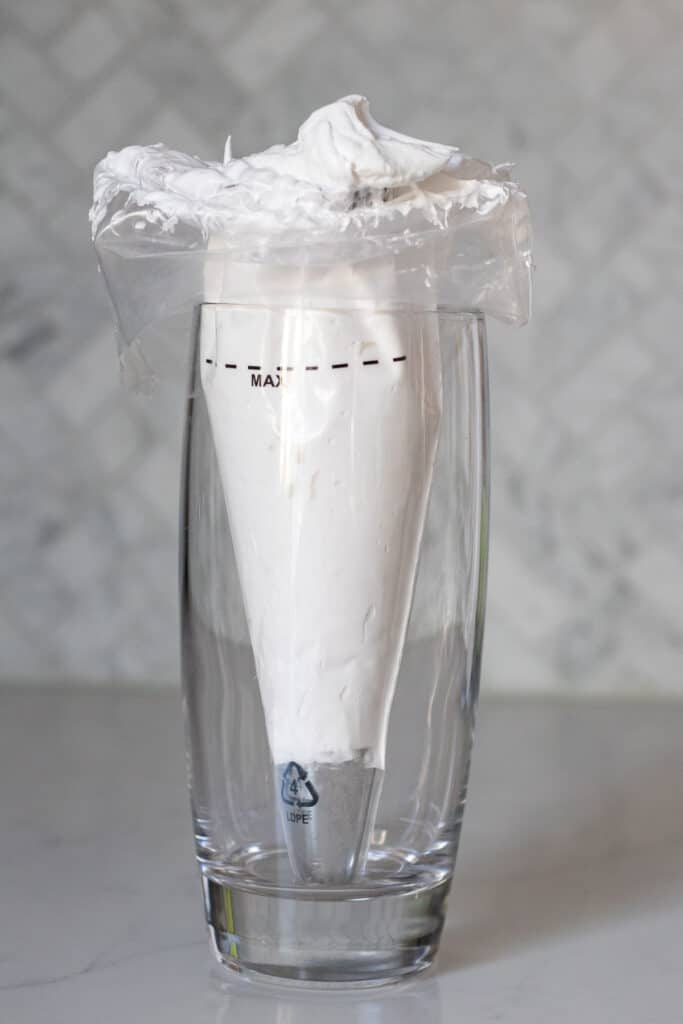
Place the meringue into a piping bag with either a large round tip or the tip of the bag snipped off. The easiest way to fill the piping bag is to place it in a tall glass and then fold the upper part of the bag over the top of the glass. Scoop the meringue into the piping bag and then unfold the bag around the top and twist it tightly to keep the meringue from coming out.
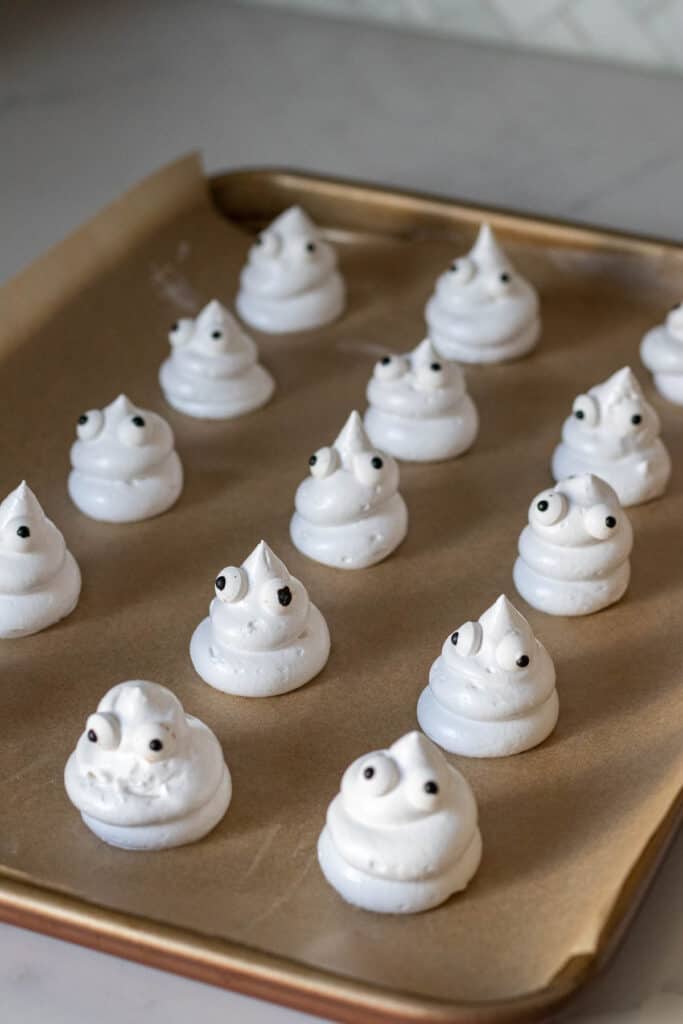
Make sure to place parchment paper on the cookie sheet before piping the meringue ghosts. Hold the piping bag perpendicular to the cookie sheet and squeeze out mounds of meringue in whatever size you want. I made about 24 ghosts out of the meringue but yours will vary depending on their size.
After placing candy eyes on the meringue ghosts, bake them in a 200-degree oven for about 1.5 hours. They should be dry to the touch but will not brown. Turn off the oven but keep the ghosts in for another 2-3 hours to let them dry out completely.
Store them in an air-tight container until you are ready to decorate the cake, for up to 3 hours.
How to store the cake
Store the cake at room temperature for 1 day. After that, refrigerate the cake using a cake container or wrapping it in foil. Place a piece or parchment paper or wax paper against the exposed side to keep it from drying out if it's been cut.
The cake will keep for 4-5 days. Before serving it, let it come to room temperature by sitting out on the counter for 30 minutes to an hour.
Can you make it in a different sized pan?
This recipe is for 3 six-inch layers which makes a cute, tall cake. Because the cake is so rich, you don't need large slices and can get about 10 slices out of the cake.
I haven't tried it with this recipe, but you could make a 2 layer 8-inch cake. Check for doneness around 20 minutes as they may take less time to bake.
For more decadent desserts, check out:
- Fudgy Peanut Butter Cup Brownies
- Triple Chocolate Cupcakes
- Chocolate Pots de Creme: 2 ways
- Nutella S'mores Cake
Tag me on Instagram @themarblekitchenblog if you make this and leave a star rating and comment below! Thank you and enjoy!
Chocolate Brownie Cake
Ingredients
Cake
- 1 cup (224 grams) unsalted butter, cubed
- 8 oz bittersweet chocolate finely chopped
- 1 ½ cups granulated sugar
- ½ cup light brown sugar packed
- 6 large eggs
- ¾ cup (96 grams) all-purpose flour
- ½ cup (40 grams) unsweetened cocoa powder
- 1 ½ teaspoons espresso powder
- ½ teaspoon baking powder
- 1 teaspoon kosher salt
Chocolate Buttercream
- 1 cup unsalted butter softened
- 3 cups powdered sugar
- ½ cup unsweetened cocoa powder
- 3 tablespoons heavy whipping cream
- 4 oz bittersweet chocolate melted and slightly cooled
Chocolate Ganache
- 4 oz bittersweet chocolate finely chopped
- ½ cup heavy whipping cream
Meringue Ghosts
- 2 egg whites
- ½ teaspoon cream of tartar
- ½ teaspoon vanilla extract
- ½ cup granulated sugar
Decorations
- 1 pan of baked brownies store bought or boxed mix is fine
- Halloween cookie cutters
- 4 oz white chocolate melted
- Candy eyes
Instructions
Cake
- Preheat the oven to 350 degrees Fahrenheit. Prepare 3, 6 inch cake pans with cooking spray and line the bottoms with parchment paper.
- In a large bowl, melt the chocolate and butter together in the microwave in 30 second intervals, stirring after each time, until fully melted.
- Stir in the sugars until well combined.
- Whisk in the eggs, one at a time, until combined.
- Add the flour, cocoa powder, espresso powder, baking powder and salt and stir until just combined, without overmixing.
- Evenly divide the batter between the 3 cake pans and smooth the tops.
- Bake for 30-35 minutes until a cake tester inserted into the middle comes out with moist crumbs and not shiny batter. Start checking the cakes around the 25 minute mark.
- Remove the cakes from the oven and let cool for at least 20 minutes on a wire rack in the pan. Then turn the cakes out onto the rack to cool completely. If not using right away, the cakes can be wrapped in plastic wrap and stored in the refrigerator overnight.
Buttercream
- Beat the softened butter until light and fluffy. Add the powdered sugar a little at a time and beat on low until fully incorporated. Add the cocoa powder on low speed and increasing to medium speed until combined.
- Add the heavy cream and mix until creamy. Add the melted chocolate and mix until combined.
Ganache
- Wait to make the ganache until you are ready to decorate the cake. Place the chopped chocolate in a small bowl and set aside.
- Heat the heavy cream in the microwave for 45 seconds.
- Pour the hot cream over the chocolate and place a plate or plastic wrap over the bowl. Let it sit for about 1-2 minutes.
- Stir the cream and chocolate until it is fully melted and completely combined. Let it cool for 5 minutes but not longer as it will become too thick to pour.
Meringue Ghosts
- Line a baking sheet (or 2) with parchment paper. Preheat the oven to 200 degrees Fahrenheit.
- In a stand mixer (or using a hand mixer), beat the egg whites, cream of tartar and vanilla extract until foamy.
- Once foamy, slowly add the sugar and continue beating on medium high speed until the sugar has completely dissolved and the meringue forms stiff peaks, about 5-6 minutes (more if using a hand mixer). To check if the sugar has dissolved, rub a small amount of meringue between two fingers. If it feels gritty, keep beating.
- Fill a piping bag fit with a large round tip (or with just the tip of the bag cut off about ½ inch) with the meringue and holding the bag perpendicular to the baking sheet, pipe mounds of meringue in whatever size you desire. I did about 2 inch ghosts and got about 24 meringues. Place the candy eyes on each ghost.
- Bake the ghosts for 1.5 hours until they are dry to the touch. Turn the oven off and let them continue to dry out for another 2-3 hours.
- Store them in an air-tight container for up to 3 days.
Assembly
- After the cakes have cooled completely, place the first layer on a cake stand or platter. Spread a layer of frosting on top of the cake and then top with the next cake layers and repeat. Spread a thin layer of frosting over the tops and sides and then refrigerate for 15-30 minutes (this is known as a crumb coat to keep crumbs out of the final layer of frosting).
- Frost the top and outside of the cake, smoothing the frosting as you go.
- Pour the ganache into the middle of the cake and use a spatula to push it to the edges, letting it drip over the cake.
- Use the halloween cookie cutters to cut out shapes from the baked brownies (if desired). Decorate the brownies with white chocolate (if desired).
- Use the white chocolate to make a spider web design over the ganache. Decorate with the brownies, meringue ghosts or any other decorations you desire.
- Refrigerate the cake until you are ready to serve it. Let it sit at room temperature for an hour prior to serving.
Notes
- Prep time/bake time does not include meringue ghosts or additional brownies for decoration.
- Inspired by Handle the Heat.

Jumel Foster says
How can I order a cake from you?
Tara Kringlen says
Hi Jumel! Unfortunately, I don't take any orders for cakes. Sorry!